
Smart Lightroom Workflow Tweaks That Reduce Your Editing Time
If you spend a lot of time in Lightroom, you start to notice the same patterns.
You import a job. You wait. You scroll. You tweak the same sliders again and again. At some point, you realise the editing itself is not the slow bit. The workflow is.
This post is about shaving time off that workflow without making the pictures worse. I am not talking about “rapid fire” edits or batching 1,000 images with zero thought. I am talking about removing speed problems and working faster. Getting Lightroom to do more of the boring stuff. And giving yourself an easier, more predictable way of working.
This is the workflow I use for weddings and family work in Lightroom Classic, where a typical job might mean several hundred frames that all need to be consistent.
In this article, I will walk through:
How I cull outside Lightroom to keep the catalogue lean
The family-shoot import preset I actually use
How I set up the Develop module for fast, focused editing
Using presets and syncing without trashing your images
My Smart Collections system and why it helps
The performance tweaks that stop Lightroom from feeling sluggish
You can read top to bottom, or just jump to the bit that matches the bottleneck you are feeling right now.
Step 1: Work out where your time is actually going
Before we start flicking options, it is worth being honest with yourself.
Take your last big job and mentally walk through it:
Card goes in.
Lightroom import.
Culling.
Base edits.
Refining and local tweaks.
Export.
Delivery.
Where does it drag?
Is it waiting for previews? The culling? The endless tiny adjustments? Export taking forever?
If you are anything like me, there will be one or two stages that feel painful (or at least used to feel that way), and the rest are tolerable. Focus on the painful bits first. That is where the tweaks will give you the most time back.
You do not need to time yourself with a stopwatch, but a bit of awareness goes a long way.
It also makes the whole thing feel less mystical. “Ah, it is mostly culling that is killing me, not the editing.” Good. Now we can work on that.
Step 2: Let import presets do more of the boring work (family sessions)
To make this concrete, here is exactly how I have Lightroom set up for a typical family shoot.
The idea is simple. I decide once how I want family jobs to be handled. Then I save that as an import preset. Next time, I only change the destination folder and everything else is already dialled in.
2.1. My family metadata preset
For family work, I use a metadata preset called “KMP Family Monochrome”.
In that preset I am not trying to fill in every possible IPTC field. I just add the bits that genuinely help:
Copy Name: “© Kevin Mullins”.
Label: “Family Photography”.
Caption: “Family Photography by Kevin Mullins”.
Alt Text (IPTC Accessibility): “Family Photography”. The Alt Text field is handy because tools like Squarespace can pull it through as image alt text later on, although I still recommend writing more detailed, context-specific alt text when you actually publish the images on your site.
Keywords: “Family Photography, Kevin Mullins”.
That gives me sensible, consistent info on every file from the moment it lands in the catalog. Other photographers might want to flesh this out with full copyright and contact details. The key point is that you do it once in the preset, not manually later.

Metadata Presets window with “KMP Family Monochrome” selected, showing Copy Name, Label, Caption, Alt Text and Keywords filled in.
2.2. Import settings for a typical family shoot
On the Import screen for a family session, my settings usually look like this:
Build Previews: set to 1:1. That means Lightroom builds full-size previews up front, so culling in Loupe view is instant rather than waiting for each frame.
Make a Second Copy To: a folder inside OneDrive that I use as a simple download backup. While the import runs, Lightroom is also cloning the raws to that location.
Apply During Import:
Develop Settings: a preset from my Film Edition 4 Collection called “Adox Silvermax 100 Profile” – in other words, my chosen monochrome look for my family jobs.
Metadata: the “KMP Family Monochrome” preset from above.
Then in the Destination panel I send the files into a clear folder structure. In the example you can see:
C:\Users\kevin\Family\2025\12. December\02.12.2025 Jasmine
So at a glance I know this is a family job, which year it was shot, the month, and the client’s name.

Import panel showing Build Previews set to 1:1, Make a Second Copy ticked to a OneDrive backup folder, Develop Settings set to “Adox Silvermax 100 Profile”, Metadata set to “KMP Family Monochrome”, and Destination pointing to a dated family folder.
2.3. Saving the whole lot as a family import preset
Once those settings are in place, I save the whole configuration as an Import Preset.
In the bottom panel of the Import window there is a dropdown labelled “Import Preset”. I click that, choose Save Current Settings as New Preset, and give it a name like:
“IP: KMP Family Mono”
Now, the next time I import a family session I simply:
Open the Import dialog.
Choose “IP: KMP Family Mono” from the Import Preset dropdown.
Change the destination folder name for the new family.
Hit Import.
The develop preset, the metadata, the preview settings, the second copy location – all of that is already set. One decision, reused for every similar job.
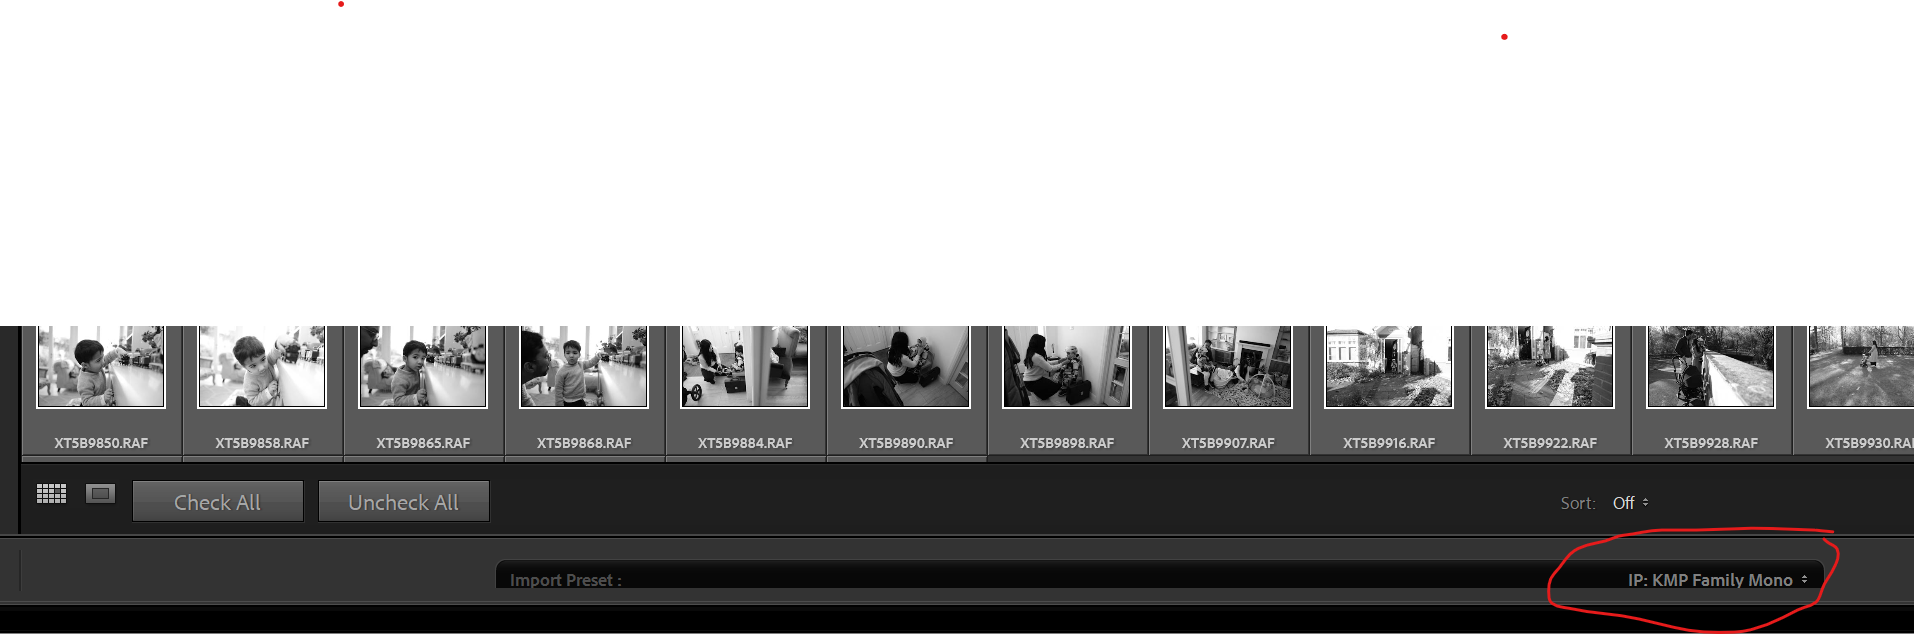
Import window with a row of family thumbnails and the Import Preset dropdown at the bottom right showing “IP: KMP Family Mono” selected.
This is one of those small, boring tweaks that quietly saves you a lot of time over a year.
Step 3: Cull before Lightroom and keep your catalog lean
Here is something I feel quite strongly about: I do not cull in Lightroom.
Lightroom is brilliant for developing and managing finished files, but it is not the fastest tool in the world for ripping through hundreds of raws and deciding what stays and what goes.
If you try to use it for everything, the catalog gets bloated and the whole application feels heavier than it needs to.
For that reason, I always do my initial selection before anything touches Lightroom.
Why I use Photo Mechanic for culling
Personally, I use Photo Mechanic for this stage. It is built for speed:
It reads the embedded previews from the raw files instead of rendering everything from scratch.
You can fly through a job in real time, tagging, colour labelling or starring images as you go.
There is almost no lag when you move from frame to frame, even on big weddings or family sessions.
Once I have gone through the shoot, I only move the keepers into the job folder that Lightroom will later import from. All the obvious blinks, misfires and near-duplicates stay behind and never even get a look in.
You do not have to use Photo Mechanic
You absolutely do not have to buy Photo Mechanic if that feels like overkill. The principle is what matters, not the brand of software.
You could:
Use Adobe Bridge to view the files and mark your selects.
On a smaller shoot, simply review the images in Windows Explorer or Mac Finder and copy the keepers into a “Selects” folder.
Whatever you choose, the idea is the same: make your selections elsewhere, then point Lightroom only at the images you have already decided to work on.
The benefit of only importing keepers
By the time I open the Lightroom Import dialog, I am already looking at a tight edit. I am not importing 250 frames from a family session, I am importing the 50 or 70 or so that have a genuine chance of being delivered.
That has a few big advantages:
The catalog stays smaller and more responsive.
Preview building is quicker.
Smart Collections, backups and exports all run against a sensible number of files.
Psychologically, you are already past the “what on earth do I keep” stage and into the editing.
You can, of course, still do small bits of “micro culling” in Lightroom later if you change your mind on a frame or two. But the heavy lifting has already been done by the time the raws arrive, which is a big part of why Lightroom feels quick and lean in day to day use.

Photo Mechanic is a great tool for culling. But the key is to NOT cull in Lightroom.
A quick detour: set up the Develop module once
Before we talk about base edits and batching, it is worth spending two minutes setting up the Develop module itself. If you are constantly scrolling up and down a huge stack of panels, you are quietly wasting time on every single image.
There are two things I like to do here.
Use Solo Mode so only one panel is open
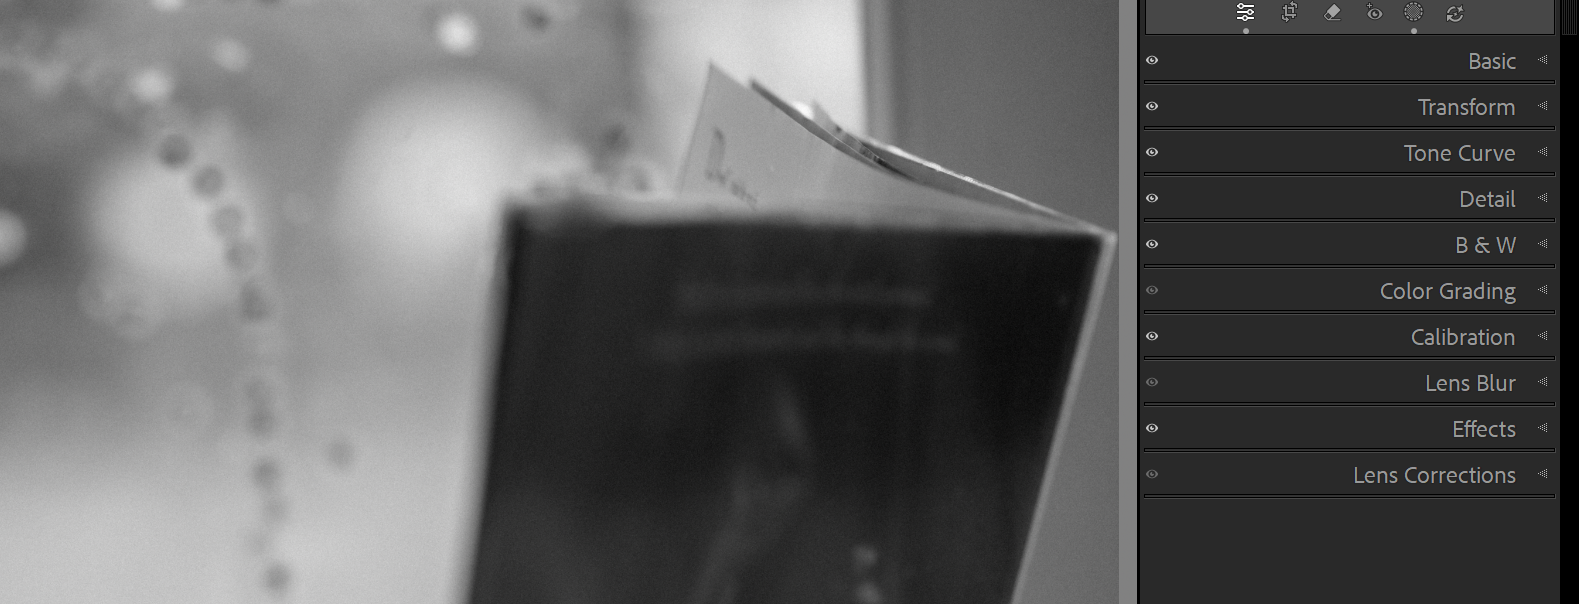
In the Develop module, you can right-click on any panel header (for example “Basic” or “Tone Curve”) and turn on Solo Mode.
With Solo Mode enabled, opening one panel automatically closes the others. That means:
You are not scrolling through seventeen open panels to find the one you need.
The interface feels calmer and more focused.
You are less likely to flick sliders in the wrong place when you are working quickly.
Develop module with the Basic panel open and all other panels collapsed, showing a tidy, compact right-hand column.
Reorder the panels so your essentials are at the top
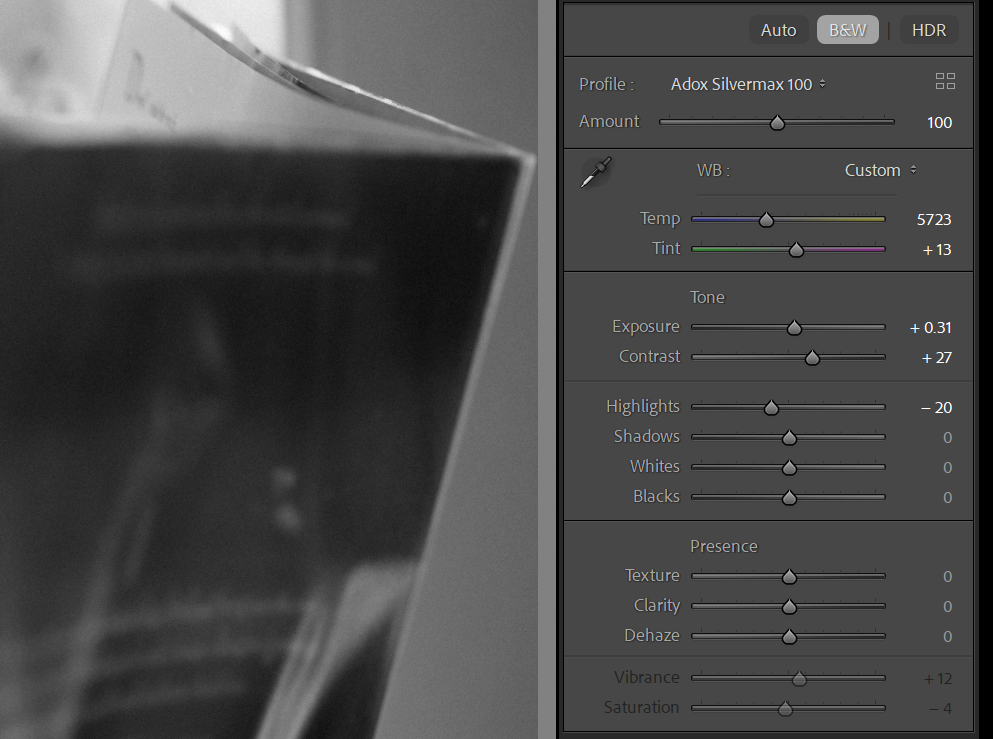
You are not stuck with Adobe’s default order. You can actually drag the panel headers up and down to put the tools you use most in easy reach. Right-click and choose “Customize Develop Panel”
In my case, for this family preset, I have:
Basic at the top, because that is where most of the global work happens.
Then Transform and Tone Curve, because I use those a lot.
Then Detail, B & W, Color Grading, Calibration, and so on further down.
The point is not that my order is the “right” one. The point is that you choose an order that matches how you actually work, and then you stick with it. Over time your hand just knows where the next panel lives, and you are not hunting for tools.
Develop panel stack reordered so Basic is at the top, followed by Transform, Tone Curve, Detail, B&W, Color Grading, Calibration, Lens Blur, Effects and Lens Corrections.
You can also right-click the panel area to hide modules you never touch, and bring them back later if you change your mind. The less visual clutter there is, the less your eye has to work every time you move between tools.
It is a tiny bit of setup, but once it is done, every edit you make for the rest of the year benefits from it.
Step 4: Get one frame right, then let Lightroom do the rest
Once the files are in Lightroom, I try not to do anything clever straight away. My aim is to get one frame in each lighting scenario looking exactly how I want it, then let Lightroom copy that look to the related images.
Fix the fundamentals first
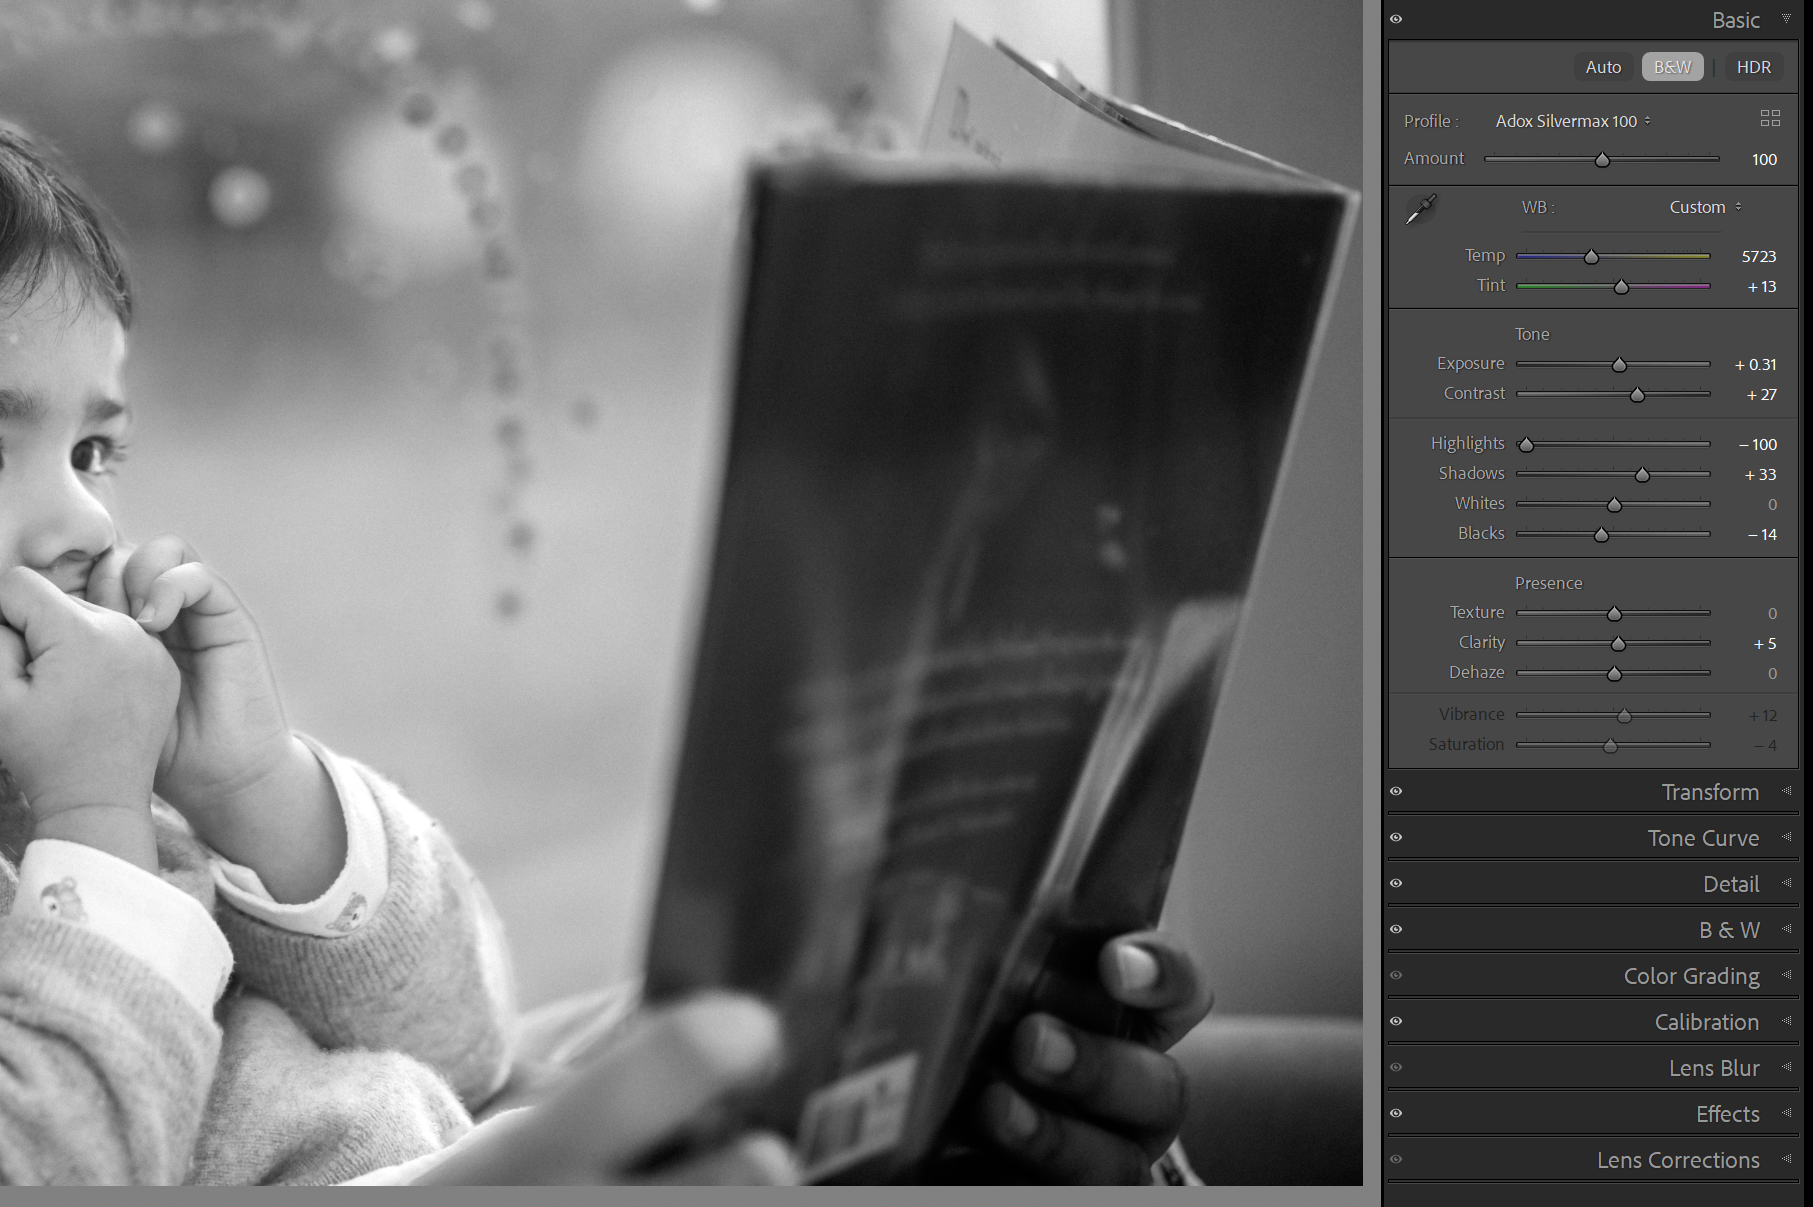
On that first frame, I always start with the basics:
Exposure and contrast.
Crop and straighten.
White balance and tint.
Even for monochrome work, white balance is crucial. It might not affect the colour you see in the final image, but it changes how the underlying channels behave and therefore how the tones fall.
A slightly warmer or cooler balance can make skin look softer or harsher, even in black and white.
Develop module Basic panel showing the Adox Silvermax 100 profile active, with exposure, contrast, highlights, shadows and white balance adjusted.
Only once the frame feels “right” in terms of light, geometry and balance do I worry about presets.
Choose the right preset (if not the same as one used on import)
For this family shoot, the import preset has already applied a monochrome look. Sometimes that is exactly what I want. Other times I will switch to a different one of my Mullins presets at this stage to better match the light or mood.
The process is:
With that hero frame selected, I audition a couple of presets from my set.
I pick the one that feels closest to the story of the scene.
I tweak it a little if needed, then save those tweaks with the image, not as a new preset.
The goal here is not to build a brand new look for every job. It is to have a small set of reliable starting points, then fine tune them for the specific session.

Presets panel open showing your a selection of my own Lightroom Presets
Sync the look across similar images
Once that one frame feels right, I select the neighbouring images from the same lighting situation and sync the look across.
The key for me is that I am syncing the overall feel, not locking myself into never touching anything again. I still step through the sequence afterwards and nudge exposure or crop where it needs it. But because the profile, curve and basic tonality are already in place, those nudges are tiny.
If you are new to syncing, start gently. Select your edited image plus a few similar ones, click Sync, and let Lightroom copy the heavy lifting. You will quickly get a feel for how far you can push it before things start to look a bit off.
What I do not sync
It is just as important to know what not to sync.
There are a few adjustments that are simply too frame-specific, so I always do them by hand on each image. If you sync these, Lightroom will happily copy them into places they do not belong, and you end up spending more time undoing the mess.
Typically, I avoid syncing:
Crop and straightening
Every frame is composed slightly differently, so I would rather make those decisions individually.Local adjustments and masks
Brushes, radial filters, linear gradients and the newer masking tools are almost always tied to a specific face, sky or corner of the frame.Spot removal / healing
Dust spots on a sensor can be similar, but people move. A cloned patch that works on one image can look very odd on the next.Transform and perspective fixes
If I fix a leaning door frame or a wonky wall, that correction is usually unique to that image.
So the rule of thumb is: sync the global look and feel, then walk through and apply these more precise tweaks where they are actually needed.
A slightly nerdy gem: Match Total Exposures
One “hidden” feature worth knowing is Match Total Exposures.
If you have shot a sequence in aperture priority and the exposures are a bit all over the place, you can:
Edit one frame to the exposure you want.
Select that frame and the others you want to adjust.
Make sure the reference image is active.
Right Click > Develop Settings > Match Total Exposures.
Lightroom will adjust the other images so their overall exposure matches the reference. It is not magic, but it is very good for sequences where the camera has chased a bright sky or a dark suit, and you do not want to fix every frame by hand.
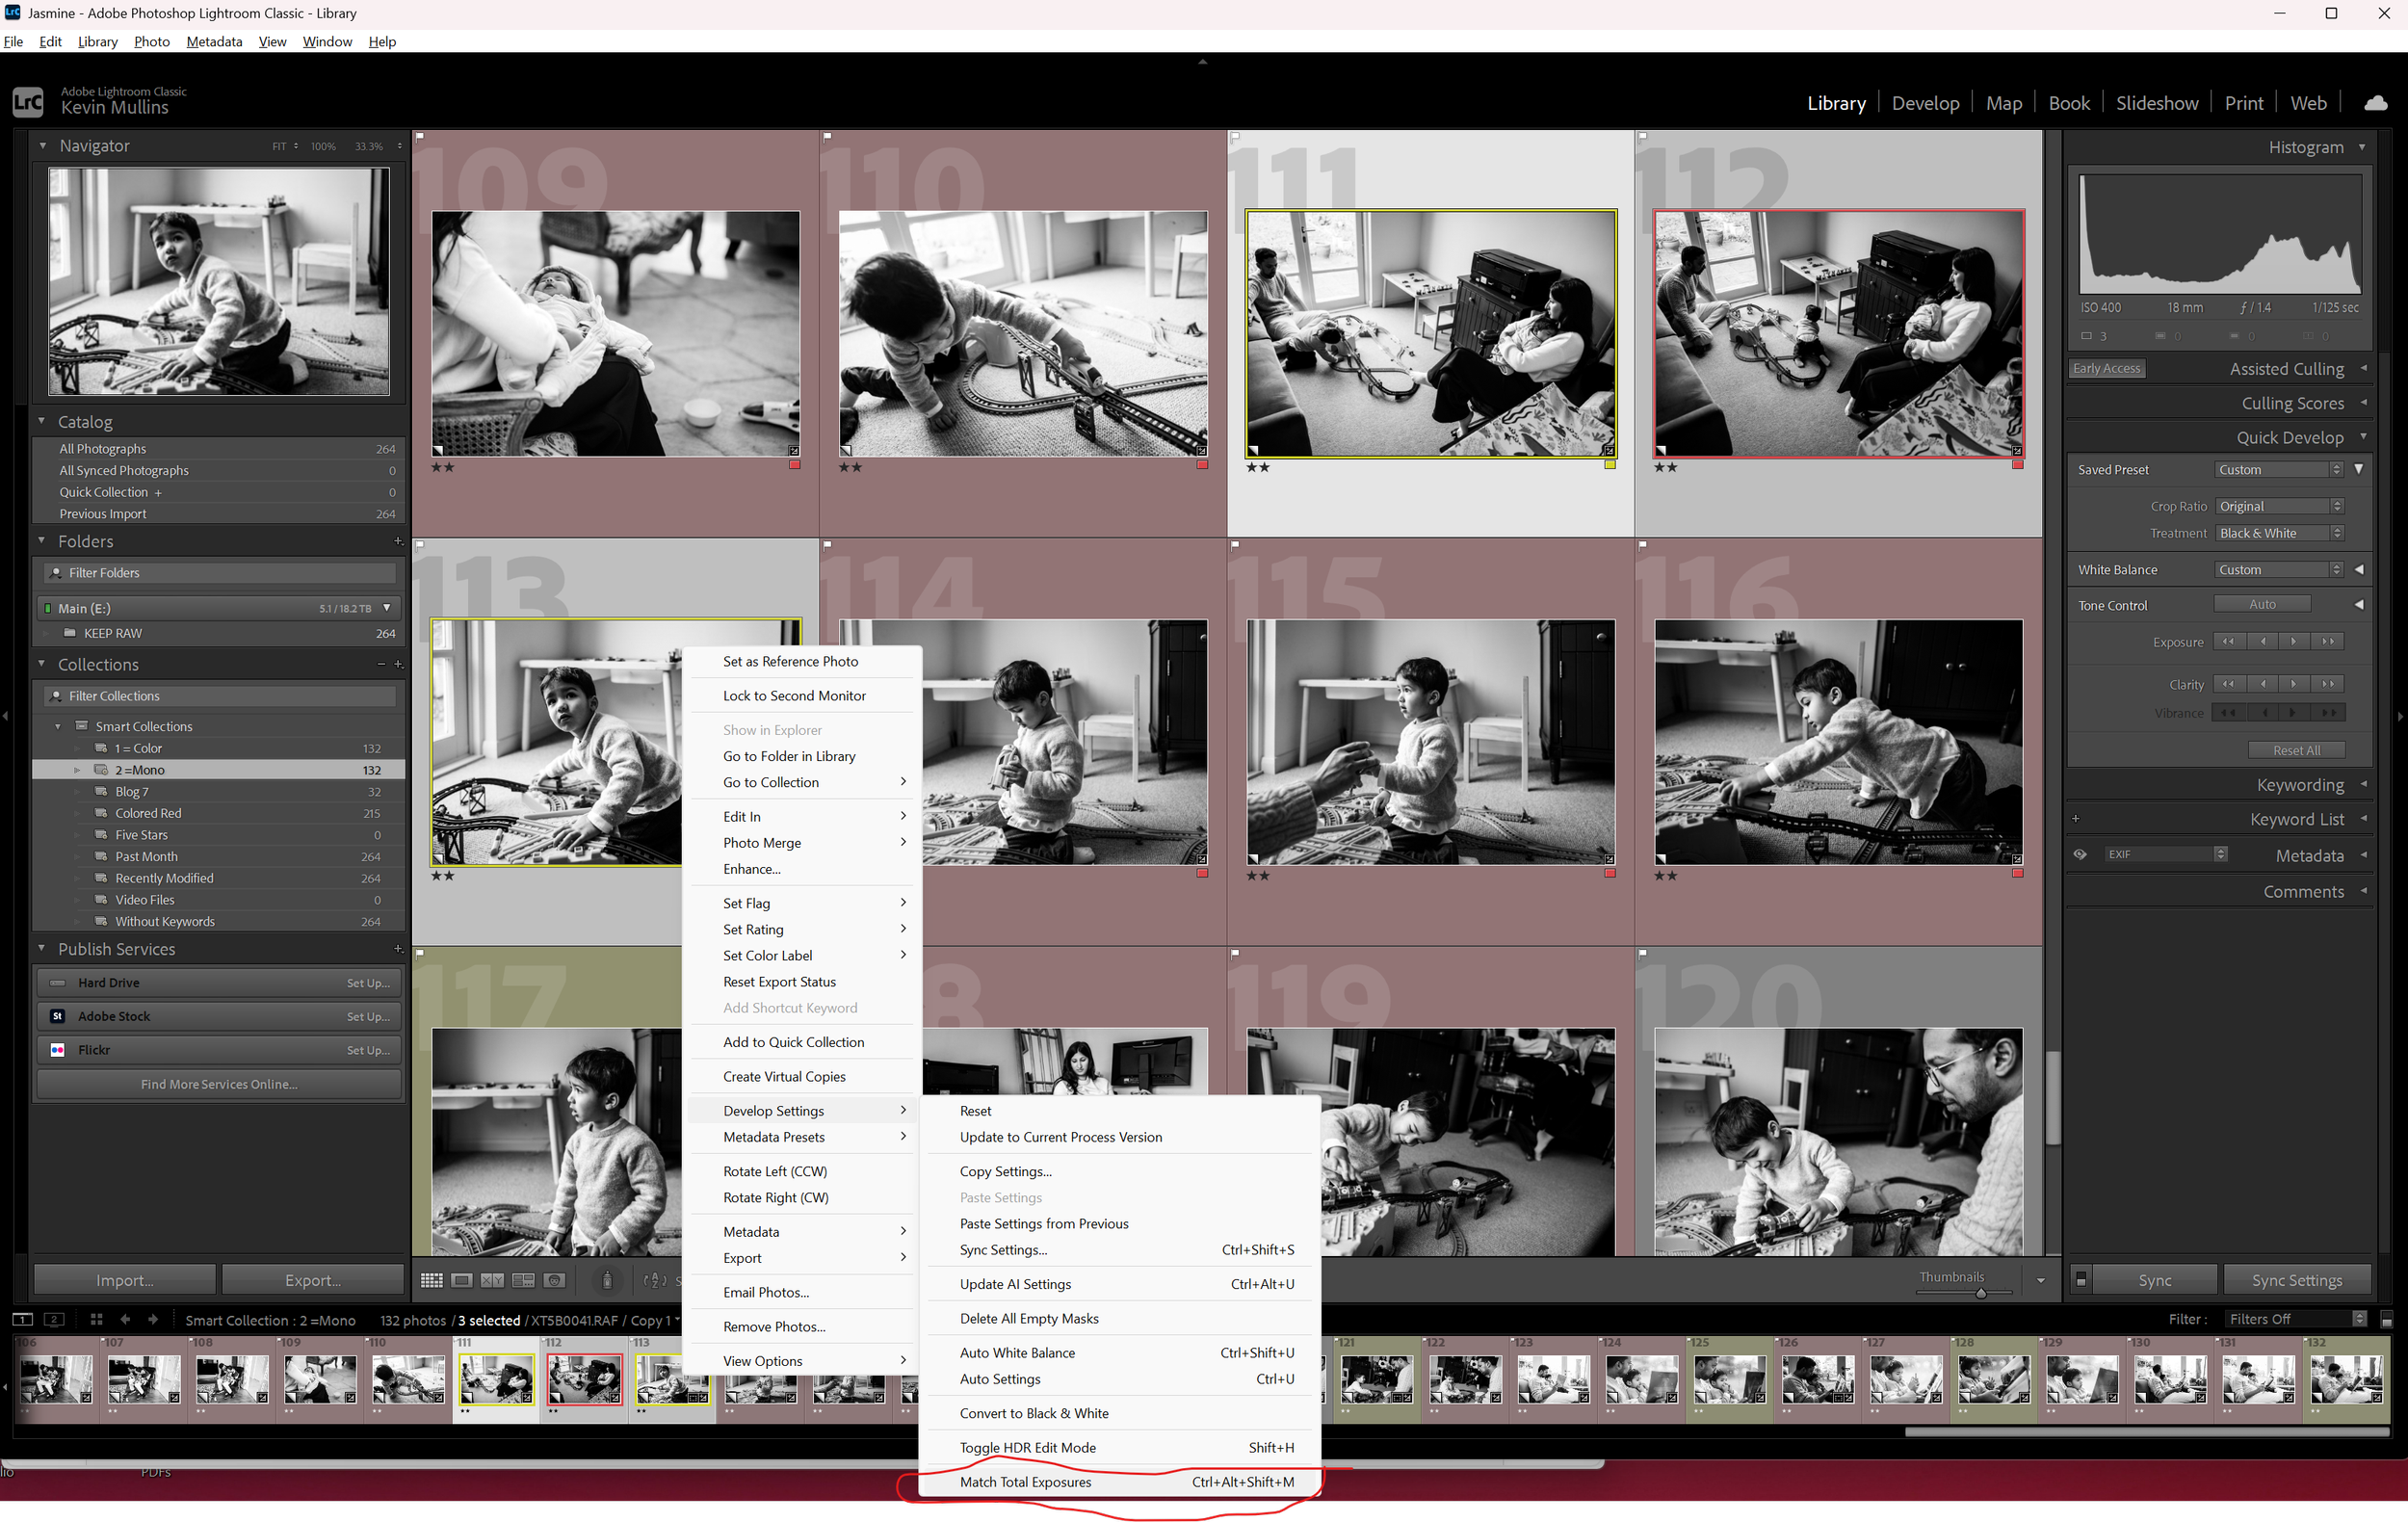
Lightroom’s Match Total Exposure Setting
A quick note on my Lightroom presets
If you like the idea of having a reliable base look for each type of job but do not fancy building it all from scratch, I have created a set of Lightroom presets that mirror the way I work. They cover both colour and monochrome, work with any camera brand, and are designed to give you a strong starting point rather than a heavy-handed “one click and hope” look.
All of the family and wedding images on my site use these presets as the foundation, with just small tweaks per frame.
Step 5: Let Smart Collections keep track of the work for you
Smart Collections are one of the most underrated parts of Lightroom. They are basically saved searches that update themselves as you work. Once you get into the habit of using them, they become a second brain for your workflow.
Over the years, I have built quite a detailed system of Smart Collections – you can see my entire smart collection workflow, and download them in my Lightroom Smart Collections Mini Course:
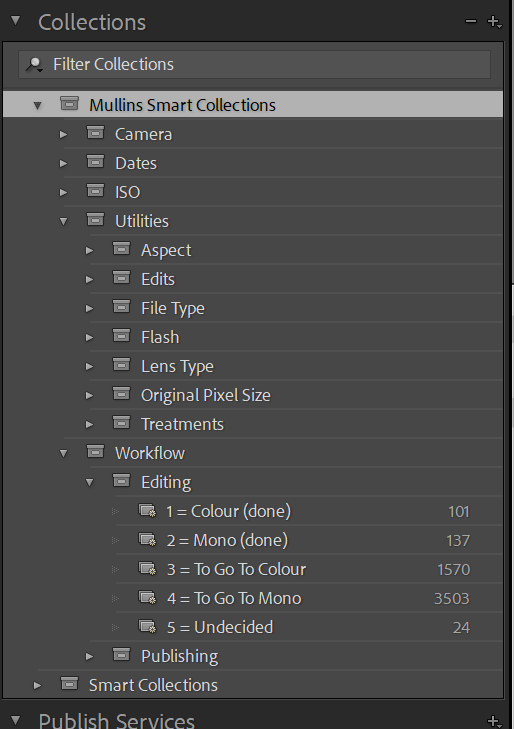
Collections panel showing “Mullins Smart Collections”
Lifetime access to this focused 20-minute mini-course where Kevin walks you, step by step, through a powerful Smart Collections system in Lightroom Classic. Learn how to automatically group images by camera, date, ISO and edit status, import Kevin’s complete Smart Collections set, and start finding the right photos in seconds instead of hunting through folders.
That whole structure underpins how I move images from “unedited” to “delivered”.
But you do not have to use my system to benefit from Smart Collections (though I think you will love it). The power is in the idea:
You define what “finished”, “in progress” or “needs attention” looks like.
Lightroom automatically gathers those images for you, based on flags, ratings, colour labels, treatments, edits and so on.
You stop hunting around in folders and start clicking on clear “buckets” of work.
A simple example Smart Collection
To keep it straightforward for this post, imagine you want a Smart Collection that always shows edited black and white keepers from a job.
You could set rules like:
Rating is greater than or equal to 3 stars.
Flag is Picked.
Treatment is Black & White.
Every time you mark an image as a pick, give it 3 stars and convert it to black and white, it will quietly appear in that Smart Collection. If you change your mind and drop it to 2 stars, it will quietly disappear again.
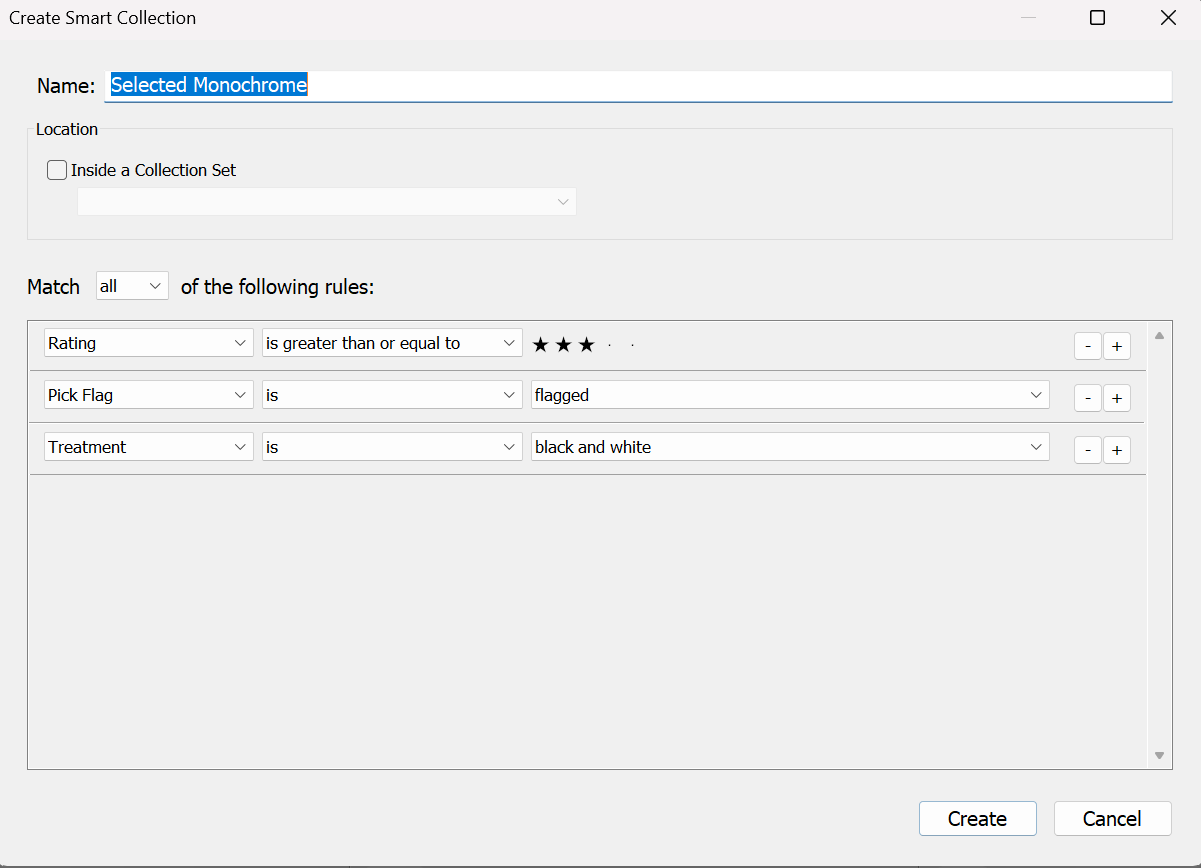
Smart Collection dialog showing rules along the lines of “Rating is greater than or equal to 3”, “Flagged is Picked”, “Treatment is Black & White”
You can build similar Smart Collections for:
Colour edits that are finished.
Images that have been flagged but have no Develop adjustments yet (a perfect “to edit” list).
Blog candidates based on a specific colour label.
Anything you find yourself manually searching for more than once.
Why this matters for speed
The biggest win is that Smart Collections turn your workflow into a series of clear stages:
“These are my picks that still need editing.”
“These are the finished colour images.”
“These are the monochrome versions.”
“These are the ones I want to blog or print.”
You do not waste time asking Lightroom the same questions over and over. You just click on the right Smart Collection and get on with the next piece of work.
Whether you build your own structure from scratch or use mine as a starting point, the principle is the same: let Lightroom do the organising so your brain can focus on the editing.
Step 6: Lightroom Keyboard shortcuts that genuinely save time
I am not going to give you a list of fifty shortcuts. Nobody remembers those. But there are a handful that, once they are in your fingers, make everything feel snappier.
Navigation
G – Grid view.
E – Loupe view.
D – Develop module.
F – Full screen view.
Tab – Hide or show side panels.
Shift + Tab – Hide or show all panels.
Culling and rating
P / X / U – Pick, Reject, Unflag.
1 to 5 – Star ratings.
6 to 9 – Colour labels.
Caps Lock – Turn Auto Advance on or off.
Editing
R – Crop.
Q – Spot removal.
\ – Before / After toggle.
Y – Split Before / After view.
Ctrl/Cmd + ‘ – Create virtual copy.
If you are new to shortcuts, pick one group (for example rating and culling) and stick with those for a week. Do not try to learn everything in a day. The aim is muscle memory, not trivia night.
Step 7: Export presets so delivery is one click, not a ritual
Export is one of those areas where people really lose time, tweaking the same settings week after week.
You can avoid that by creating export presets for each type of output you actually use.
Typical ones might be:
Client JPEGs – full size
Original dimensions.
sRGB.
Output sharpening for “Screen – Standard” or “Matte paper – Standard”, depending on your lab.
Blog / website images
Long edge resized to your site’s content width.
Include a watermark.
sRGB.
Export to a “Blog_Exports” folder inside the job folder.
Social media
Long edge around 2,048–2,560 pixels.
sRGB.
Maybe a subtle watermark if you want it.
Each of these can be saved as a named preset in the Export dialog. Next time, you just select the images and choose the preset. No more hunting through every tab.

Export dialog with several export presets listed on the left.
Step 8: Performance tweaks that quietly support all of this
I do not obsess over every tiny performance setting in Lightroom, but there are a few habits that make a real difference when you are editing a lot.
Keep the catalogue and previews on a fast drive
If you can, keep your Lightroom catalogue and its previews on an internal SSD.
The raw files themselves can live on a bigger, slower drive if they have to, but the catalogue really benefits from speed. That is the bit Lightroom is constantly reading and writing to as you move around.
Use sensible Standard Preview size and quality
Go to:
Edit → Catalog Settings… → File Handling (Windows)
Lightroom Classic → Catalog Settings… → File Handling (Mac)
In there you will see:
Standard Preview Size – I usually leave this on Auto, or pick a size that is close to the long edge of your main display.
Preview Quality – Medium is a good balance between speed and how things look on screen.
If these are set unnecessarily high, Lightroom spends its life building huge previews that you never really see at full size. Dialling them in sensibly keeps things snappier.

Catalog Settings window on the Previews tab, showing Standard Preview Size set and Preview Quality set to Medium
Camera Raw cache and GPU
Next, head to Edit → Preferences… → Performance.
Two things to look at here:
Camera Raw cache size
Increasing this (within reason) lets Lightroom re-use data from recent images instead of reading the raws from disk every time. If you have the space, bump it up a bit.Use Graphics Processor
On newer machines, leaving this on Auto is usually fine. On older or slightly flaky systems, it can be worth trying Custom, or even turning certain GPU options off, to see if it actually feels smoother. It is one of those “experiment for ten minutes” settings that can pay off in hours saved later.
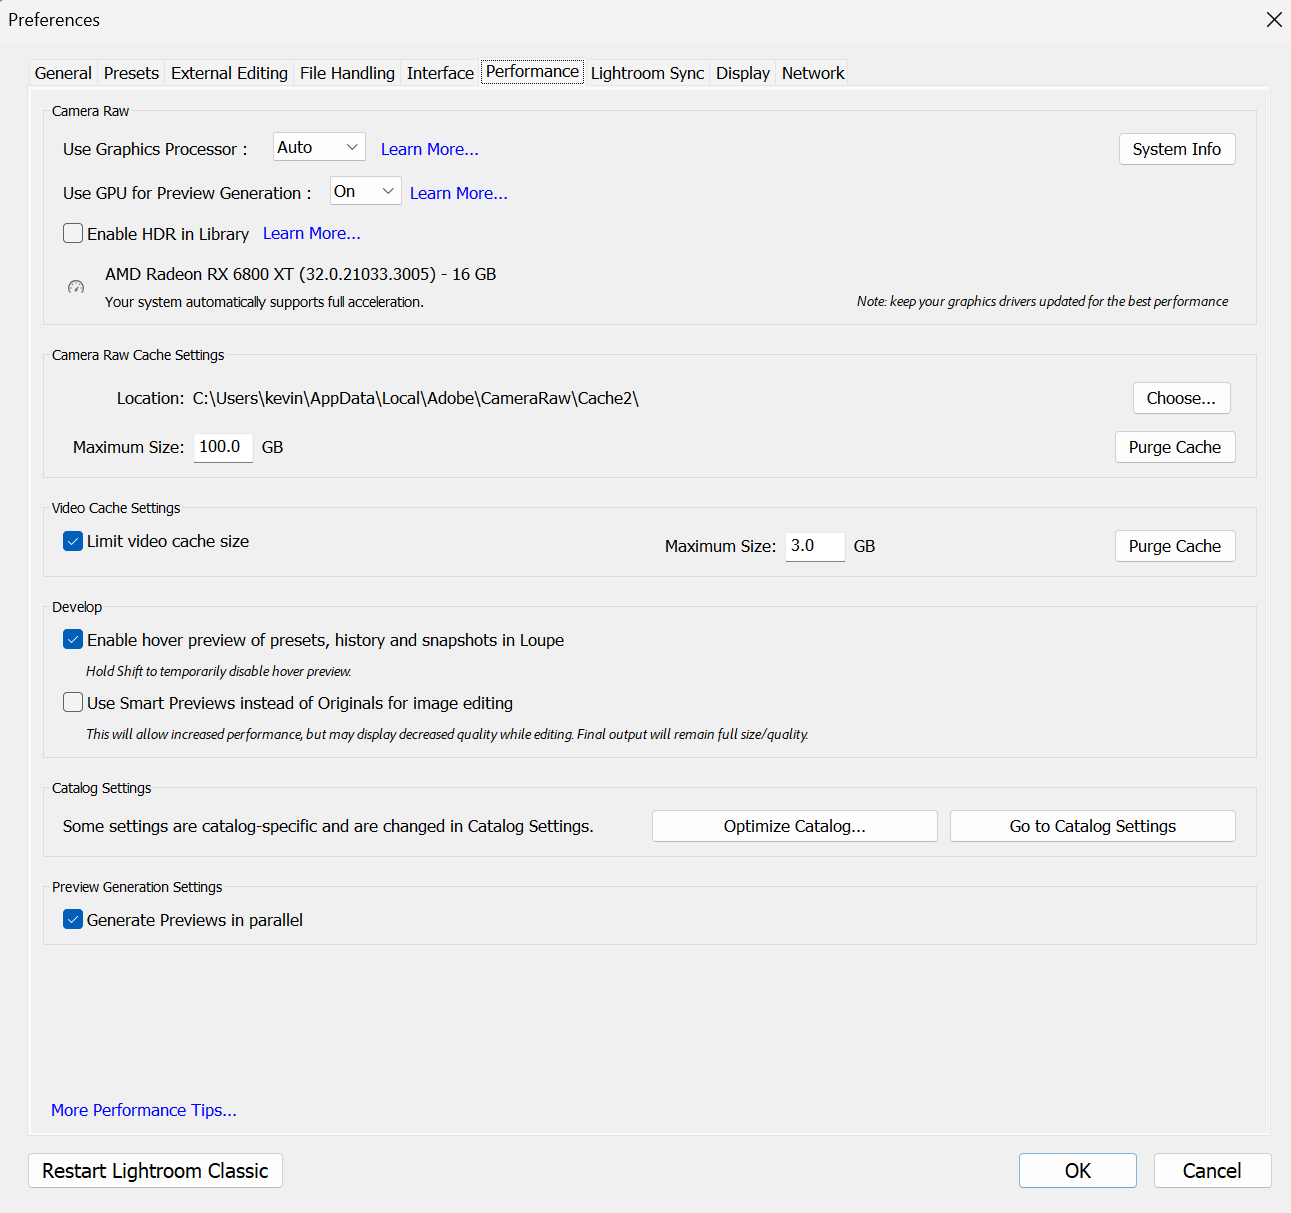
Preferences window on the Performance tab showing Camera Raw cache size increased and GPU settings visible.
If you convert to DNG, make it count
If you convert your files to DNG on import, the Preferences → File Handling tab is where you can speed that up a little.
For example:
JPEG Preview: Medium Size.
Embed Fast Load Data: ticked.
That combination keeps DNG sizes sensible and lets Lightroom use the fast load data to make Develop feel more responsive.
Tidy the catalogue every so often
A couple of housekeeping things also help:
Use File → Optimize Catalog now and then, especially if you have deleted a lot of images or finished big jobs.
Once a job is truly finished and backed up, consider clearing its Develop History. The current settings stay, you just lose the step-by-step list of everything you did, which can trim a bit of weight.
None of this is ground-breaking, but the difference between “fine” and “annoying” in Lightroom is often these little things stacked together.
Step 9: How this looks in practice on a real job
To pull all of this together, here is how a family session might run with this workflow.
Cull outside Lightroom: I run through the raw files in Photo Mechanic, make my selections there, and copy only the keepers into the job folder that Lightroom will see.
Import with a family preset: In Lightroom I open the Import dialog, choose my “IP: KMP Family Mono” import preset, and set the destination folder for that client. The develop preset, metadata, backup location and preview settings are already chosen.
Let previews build: Lightroom builds 1:1 previews while I listen to The Fujicast. When I sit down to edit, everything is ready and responsive.
Set up the Develop view: In the Develop module I am already in Solo Mode, with the panels arranged in the order that suits me. Basic, Transform and Tone Curve are at the top, with the less-used bits further down.
Get one frame right per lighting scenario: For each chunk of similar light, I pick one frame and fix exposure, contrast, crop, straightening and white balance. Then I decide whether to stick with the preset from import or switch to a different one from my own set.
Sync the look, not the fiddly bits: I sync the global look to the neighbouring frames, but I still handle crop, masks, spot removal and perspective fixes individually where they are needed.
Let Smart Collections tell me what is next: My “Mullins Smart Collections” keep track of what is edited, what is still in progress, and what is undecided. If I want to see all finished monochrome keepers, or everything that still needs attention, it is just a click.
Run export presets: When I am done, I select the final set and run my “Client Full Size” export preset, then the blog or web preset on any images I want to share online.
At no point am I manually setting export options, hunting through folders, or wondering which images still need editing. Lightroom is simply following the rules I gave it.
Lightroom workflow FAQ
-
No. I use Photo Mechanic because it is extremely fast, but the principle is what matters. You can use Bridge, FastStone, or even just Finder / Explorer as long as you make your selections first and only import the keepers into Lightroom.
-
Yes. The family example in this post is monochrome, but the logic is exactly the same for colour. You still benefit from culling outside Lightroom, using import presets per job type, trusting a base look, syncing smartly and letting Smart Collections track your progress.
-
There is no fixed rule, but if you are working regularly it is worth running File → Optimise Catalog every few weeks, or after you have finished and delivered a big job. It is a bit like defragging a hard drive: boring but healthy.
-
Yes. My system plugs into any existing catalogue because it is based on flags, ratings, colour labels and treatments rather than specific folder structures. You can build your own from scratch using the ideas in this post, or, if you want the exact setup I use, there is a short lesson available where I include my Smart Collections and show how to install and use them.
-
If you only open Lightroom a few times a year, you probably do not need the full system. I would still suggest setting up one good import preset and one export preset though. Those two alone remove a lot of faff, even for occasional use.
Bonus tips: small tweaks that do not quite fit anywhere else
A few extra things that do not warrant a full section on their own, but may help.
Use a Target Collection for “blog candidates”
Create a regular collection called something like “Blog – Current Year”, right-click it and choose “Set as Target Collection”. Now, whenever you hit the B key on an image, Lightroom throws it into that collection. It is a very simple way of building a pool of interesting frames while you edit, without breaking your flow.Virtual copies for alternate versions
If you want a black and white version and a colour version of the same frame, or two different crops, use a virtual copy rather than duplicating the file. Press Ctrl/Cmd + ' to create a virtual copy, then treat it as a separate image in your workflow. It is much lighter on the catalogue than exporting and re-importing variants.Snapshots for safety nets
When you reach a point in the edit that you like, but you want to experiment a bit further, create a Snapshot. That way you can always jump back to that exact state without digging through the History list. It is handy if you are trying a slightly bolder grade or a different curve.Quick Develop for gentle global nudges
In Grid view, the Quick Develop panel in the Library module lets you bump exposure, contrast and white balance on multiple images at once without going into Develop. It is not as precise, but it is very fast for “everything from this part of the day needs half a stop more” adjustments.Secondary display if you have two screens
If you work with a second monitor, try turning on the Secondary Display from the Window menu. You can have Loupe or Grid up there while you tweak in Develop on the main screen, which is surprisingly nice for checking how a sequence feels as a whole while you fine-tune a single frame.
None of these are essential, but once they are in your muscle memory they shave off lots of tiny interruptions and make Lightroom feel more like a well-set-up workspace than a jumble of panels and sliders.
Closing thoughts
If this feels like a lot, do not try to rebuild your entire Lightroom life in one go. Pick one area that annoys you the most and fix that first.
Maybe that is:
Creating a proper import preset for different shoots.
Rearranging the Develop panels and turning on Solo Mode.
Setting up one or two Smart Collections that always show “images to edit”.
Once that feels normal, add another tweak. The aim is not to become obsessed with speed, it is to remove unnecessary problems so that your time in Lightroom is actually spent making good decisions, not fighting the software.
The nice side effect is that when your workflow is predictable and repeatable, your work is more consistent and you get more of your life back. And that, quietly, is the real win.
Kevin 🔉 Listening to Kevin Mullins Radio show from 2023
To finish, here are a few frames from the family session I have been using as the example throughout this post. These are all edited with the exact workflow I have described – culled outside Lightroom, imported with the family preset, tuned on a single frame and then synced and refined.
They are not here as “hero portfolio pieces” so much as a quiet reminder of what this is all for: edited cleanly and consistently without spending half your life in front of a progress bar.
You can see more of these images in this blog post.


