
Mullins Monochrome Studio User Guide
This user guide is written for people who already own the plugin. It covers installation, registration, troubleshooting, and day-to-day use inside Lightroom Classic. If you’ve landed here and you don’t have it yet, you can find full details and the download on the plugin page.
Mullins Monochrome Studio User Guide
This is the complete user guide for the Lightroom Classic plugin. It’s written for people who already own it, so it’s straight into how to use everything, plus a few practical ideas along the way.
Installation
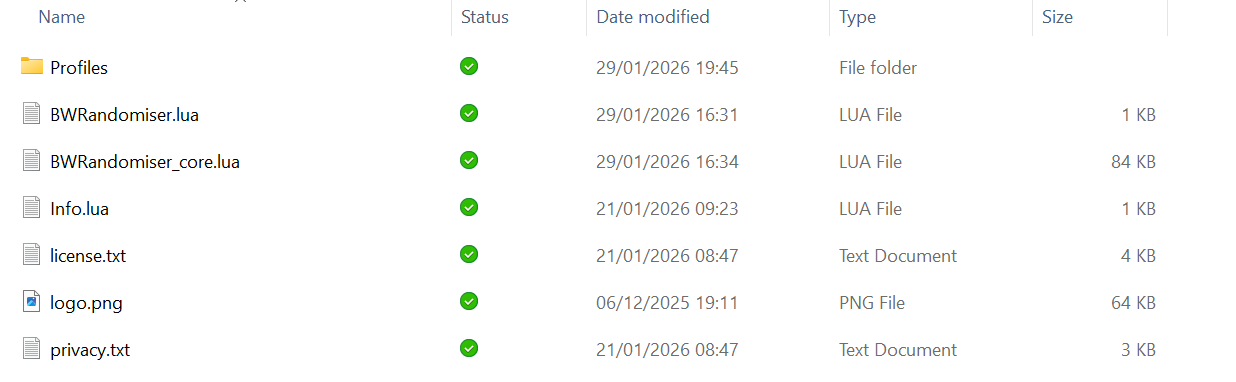
You’ll receive Mullins Monochrome Studio as a zip file. The goal is: unzip it, then point Lightroom Classic at the plugin folder using Plugin Manager.
Important: do not run the plugin from inside the zip file. Always unzip first.
1) Unzip the download
Unzip the file you downloaded. You should end up with a folder that ends in .lrplugin (or a normal folder that contains the .lrplugin folder inside it).
2) Install via Lightroom Classic Plugin Manager
Open Lightroom Classic, then go to File > Plug-in Manager. Click Add, then browse to the unzipped .lrplugin folder and select it. Make sure it shows as enabled.
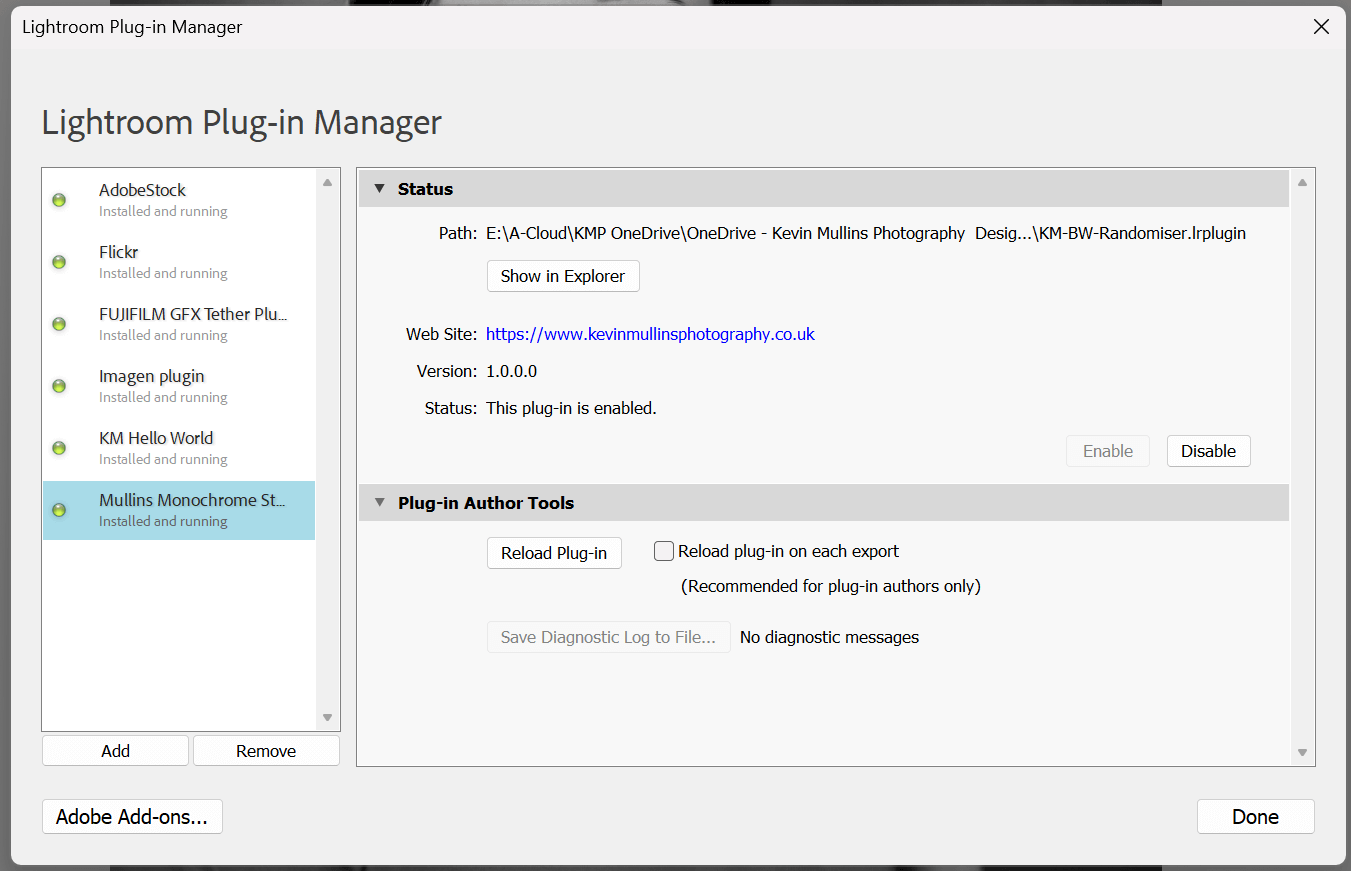
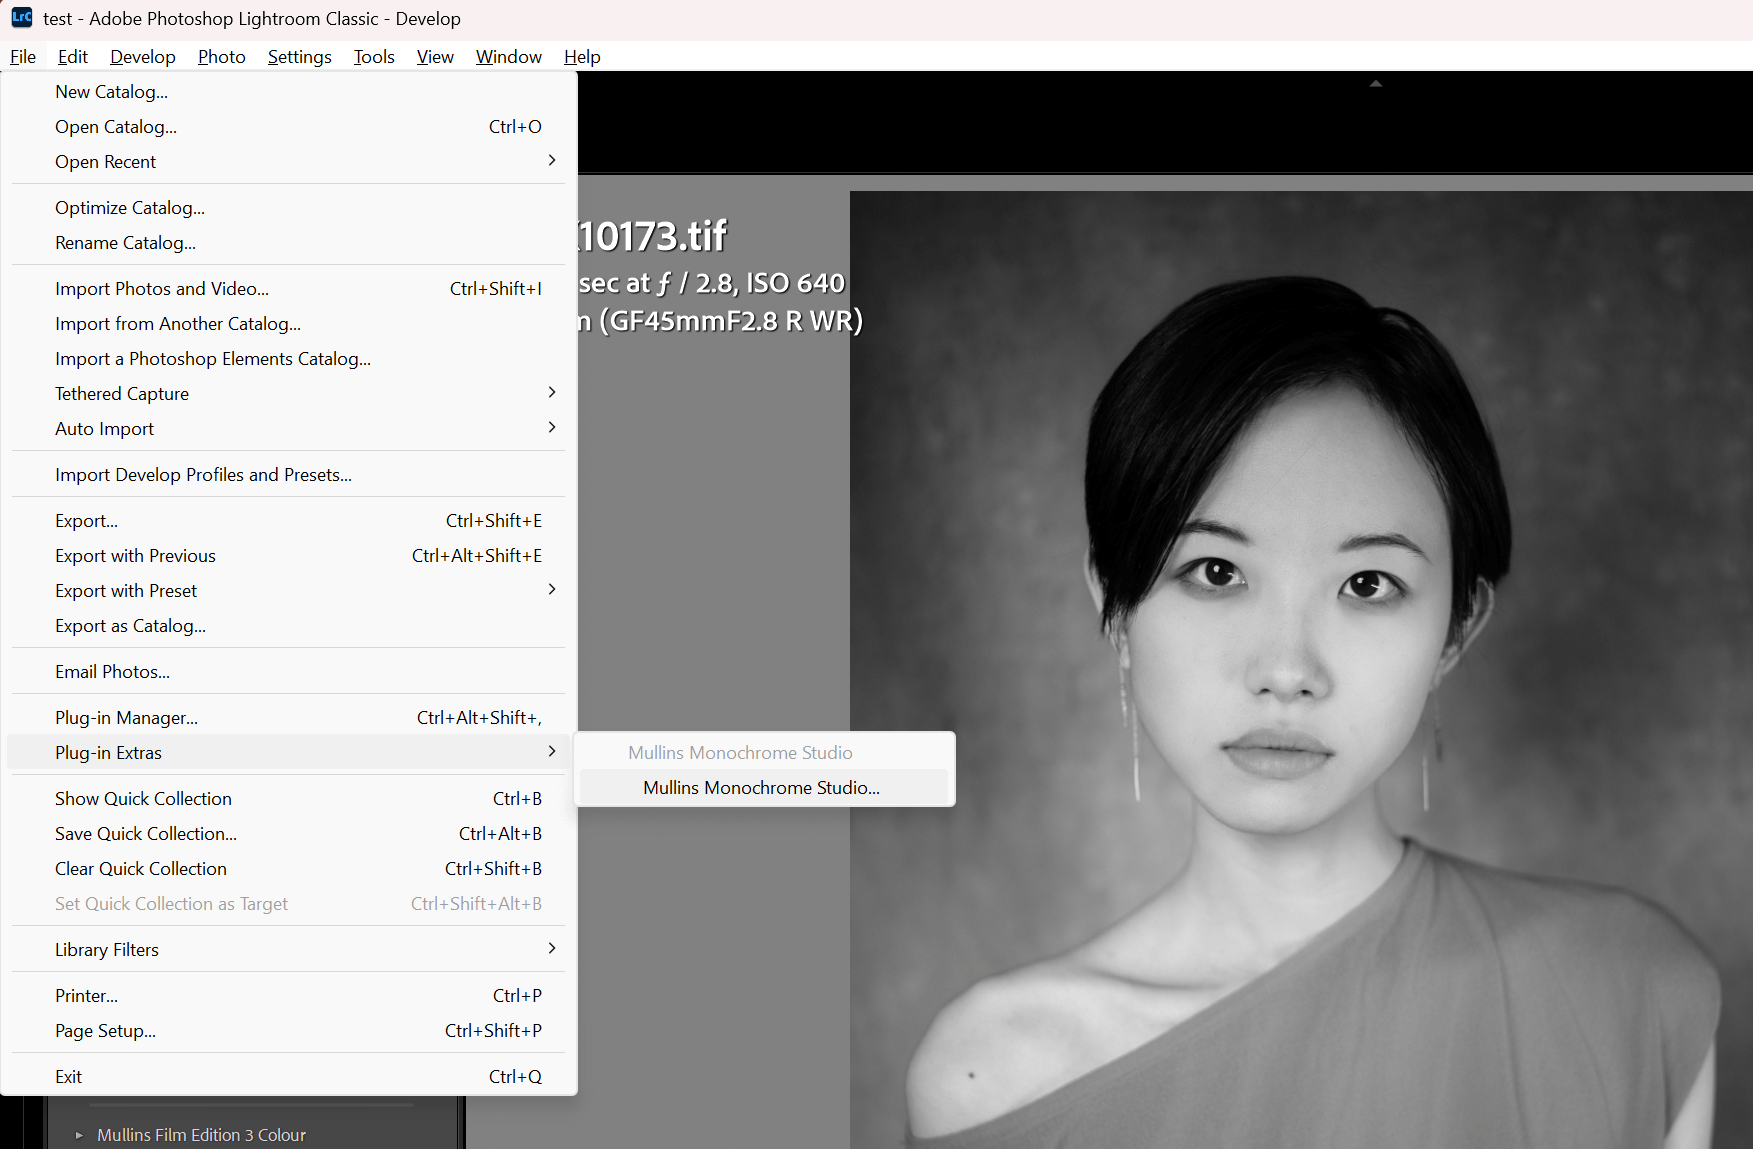
3) Confirm it’s working
In Lightroom Classic, open File > Plug-in Extras. You should see Mullins Monochrome Studio listed there. Click it to open the plugin.
If it doesn’t appear (common fixes)
- Make sure you fully unzipped the download.
- Make sure you added the folder ending in .lrplugin, not the zip file.
- Open Plugin Manager again and confirm it’s enabled.
- Restart Lightroom Classic.
Quick Start (5 minutes)
If you want the fastest route to a decent look, do this on one photo first. Don’t overthink it. The plugin is built for experimentation.
- In Lightroom Classic, click one photo so it becomes the target photo.
- Open the plugin from File > Plug-in Extras > Mullins Monochrome Studio.
- On the Main tab, set Mode to Subtle and Intensity to Normal.
- Leave Quick preset on No change for the first few goes.
- Click Generate Now a few times to see the range.
- When you find something that’s nearly right, click New Variation to explore that same “family” of looks.
- If you get a winner, save it later in Saved Looks & Licence.

If you already have an edit you like on a photo, take a Lightroom Snapshot first. The plugin changes Develop settings on the active photo, which is the whole point, but it’s worth a quick safety habit.
Main tab
The Main tab is where you generate looks and steer the overall direction. In the plugin it’s split into Look settings : and Actions :.
Look settings :
This box controls the overall character of the look before you generate.
- Mode: Subtle, Classic, Punchy. Start on Classic until you know what you want.
- Intensity: Gentle, Normal, Strong. Normal is the sensible baseline. Strong can get heavy quickly.
- Base profile: this is the foundation profile used for the look.
Base profile and Install / Repair
Next to Base profile you’ll see the button Install / Repair and a status label. The status text will show as one of these:
- Installed (tooltip: “Mullins profiles are installed. If you cannot see them in Lightroom, restart Lightroom Classic.”)
- Repair needed (tooltip: “Some Mullins profile files are missing. Click Install / Repair to fix.”)
- Not installed (tooltip: “Click Install / Repair to install the Mullins profiles.”)
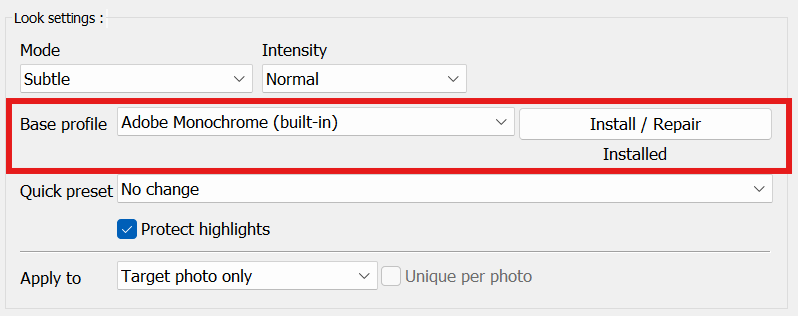
If the status says Installed but you can’t see Mullins profiles in Lightroom, restart Lightroom Classic. That fixes it most of the time.
Quick preset
Quick preset is a fast starting point. These are the options in the dropdown:
- No change
- Clean Documentary
- Classic Contrast
- Punchy Street
- Matte Soft
- Crushed Drama
They apply as soon as you select them. There’s no extra button press needed.
Protect highlights
Protect highlights is a simple safety switch. Leave it on if you’re working with bright skies, pale clothing, reflective surfaces, or anything where the top end matters. It’s enabled by default.
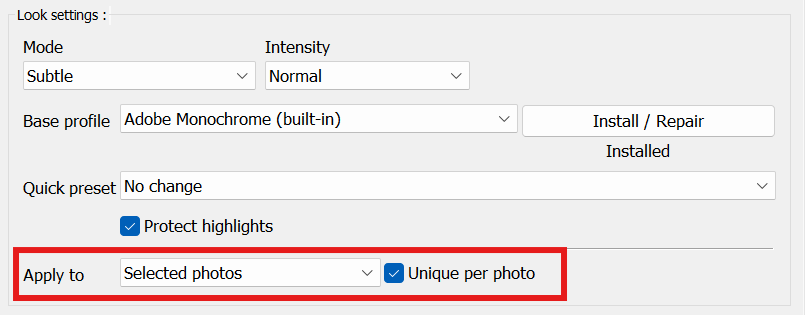
Apply to
Apply to controls which photos are affected when you use the Actions buttons:
- Target photo only
- Selected photos
If you set Apply to to Selected photos, you can enable Unique per photo.
Unique per photo tooltip: “Only applies when Apply to is set to Selected. Generates a different look for each selected photo.”
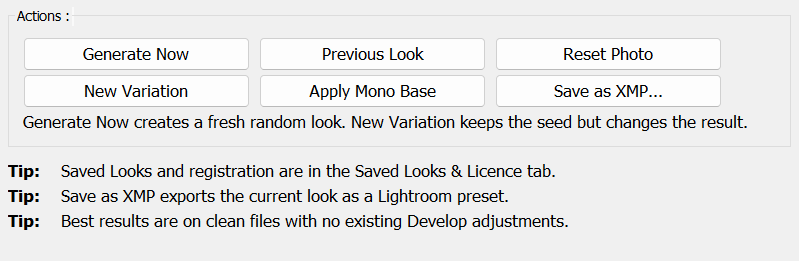
Actions :
This box is where you actually do things.
- Generate Now: creates a fresh random look.
- New Variation: keeps the seed but changes the result. It’s the best way to explore a look you nearly like.
- Previous Look: steps back through plugin-generated looks for this session. This is not Lightroom Undo.
- Apply Mono Base: applies the monochrome base without doing a full random look.
- Reset Photo: resets Develop settings for the target/selected photo(s). It does not reset Lightroom preferences or your catalogue.
- Save as XMP...: exports an XMP preset from the target photo. Includes the selected Base profile/look and forces Camera Profile to Adobe Standard so it matches what you see.
A simple way to learn: generate 10 looks with Quick preset on No change, pick the best one, then use New Variation 10 times to explore that same direction. Save the best result as a Look.
If Generate Now is disabled or you see a message about registration, go to Saved Looks & Licence and enter your licence code in the Registration area.
Tweaks tab
This tab is for when you’re close. It’s less “start again” and more “steer it”. You’ve basically got three areas: Tone curve, Colour grading (toning), and Locks.
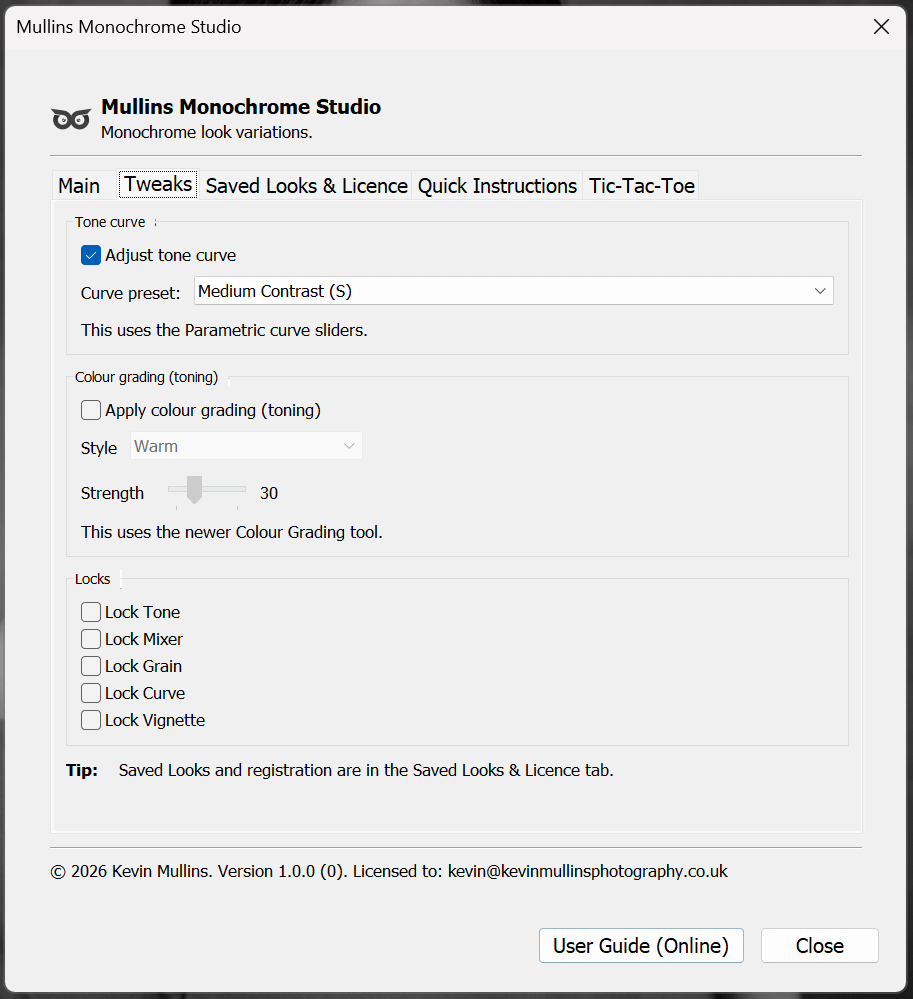
Tone curve
The Tone curve section lets you apply a controlled Parametric curve shape. It’s intentionally Parametric, not Point Curve.
- Tick Adjust tone curve.
- Choose a Curve preset: from the dropdown.
- Click Generate Now or New Variation on the Main tab to see it in action.
Note: this uses the Parametric curve sliders (the plugin keeps the Point Curve linear).
Curve preset options:
- Medium Contrast (S)
- High Contrast (S)
- Crushed Blacks
- Lifted Blacks (Matte-ish)
- Soft Roll-off
Practical idea: if you like a look but highlights feel a bit brittle, try Soft Roll-off and regenerate a few times. It often calms the top end without killing the midtones.
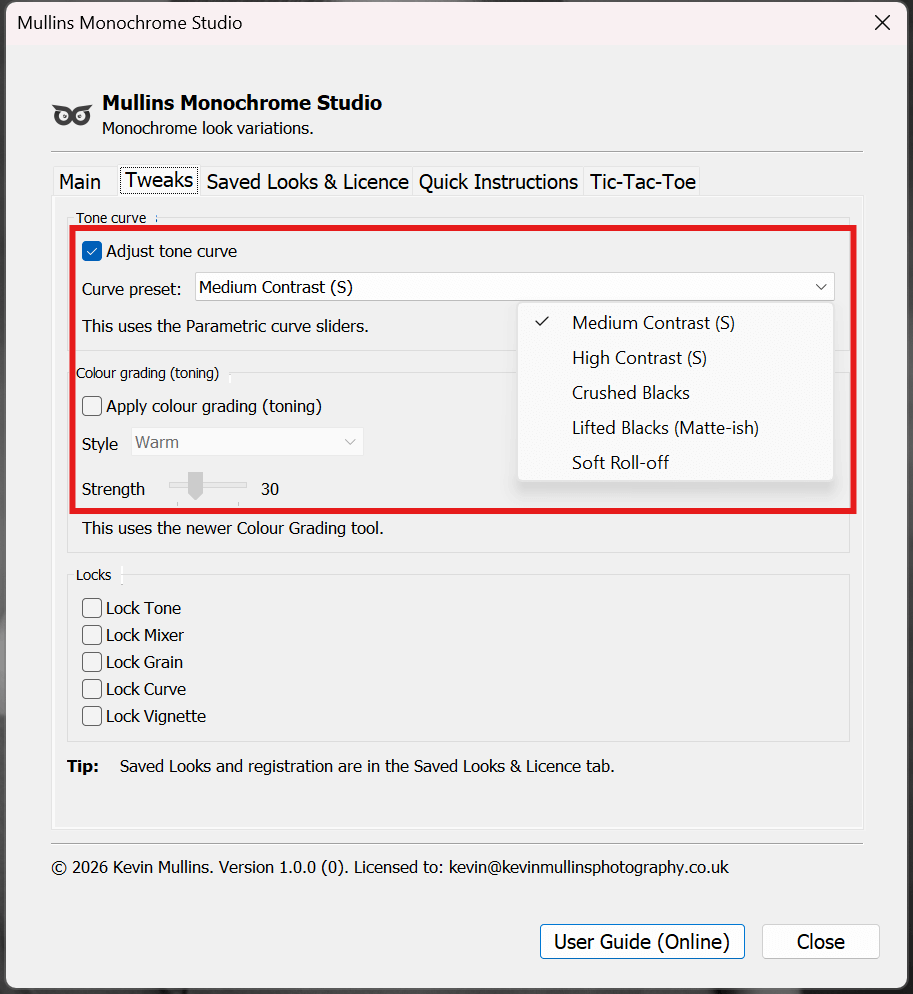
Colour grading (toning)
This is optional toning using Lightroom’s newer Colour Grading tool. It can be very subtle, or it can be obvious, depending on Strength.
- Tick Apply colour grading (toning).
- Set Style to Warm, Cool, or Random.
- Set Strength (0 to 100).
- Generate again (Main tab) to roll a fresh variation within that style.
Note: this uses the newer Colour Grading tool.
Practical idea: keep Strength low (roughly 10 to 25) if you want “just a hint”. Above that it starts to feel like a creative decision, which is fine, but you’ll notice it more.

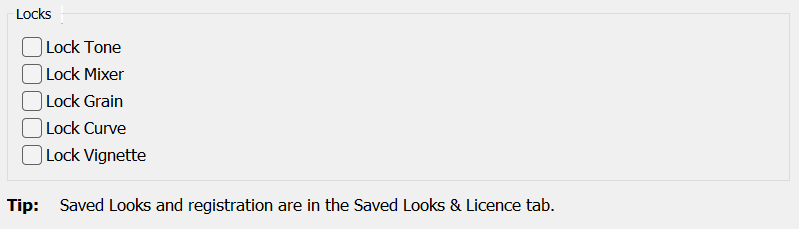
Locks
Locks are how you stop the plugin from changing the bits you already like. The simplest way to use them is: generate a look first, then lock what you want to keep, then use New Variation.
- Lock Tone (tooltip: “Locks Contrast, Highlights, Shadows, Whites and Blacks, Clarity & Dehaze.”)
- Lock Mixer (locks the B&W Mix / channel mixer values)
- Lock Grain (locks Grain Amount)
- Lock Curve (locks the tone curve settings, only available when Adjust tone curve is enabled)
- Lock Vignette (locks Post-crop Vignette Amount)
A really solid workflow: Generate a look you like. Tick Lock Tone to keep the overall tonality. Then hit New Variation a few times to explore different mixes, grain, vignette and curve (depending on what you’ve left unlocked).
Saved Looks & Licence tab
This tab does two jobs: it’s where you manage Saved Looks (stored inside Monochrome Studio), and where you enter your Registration details on this computer.
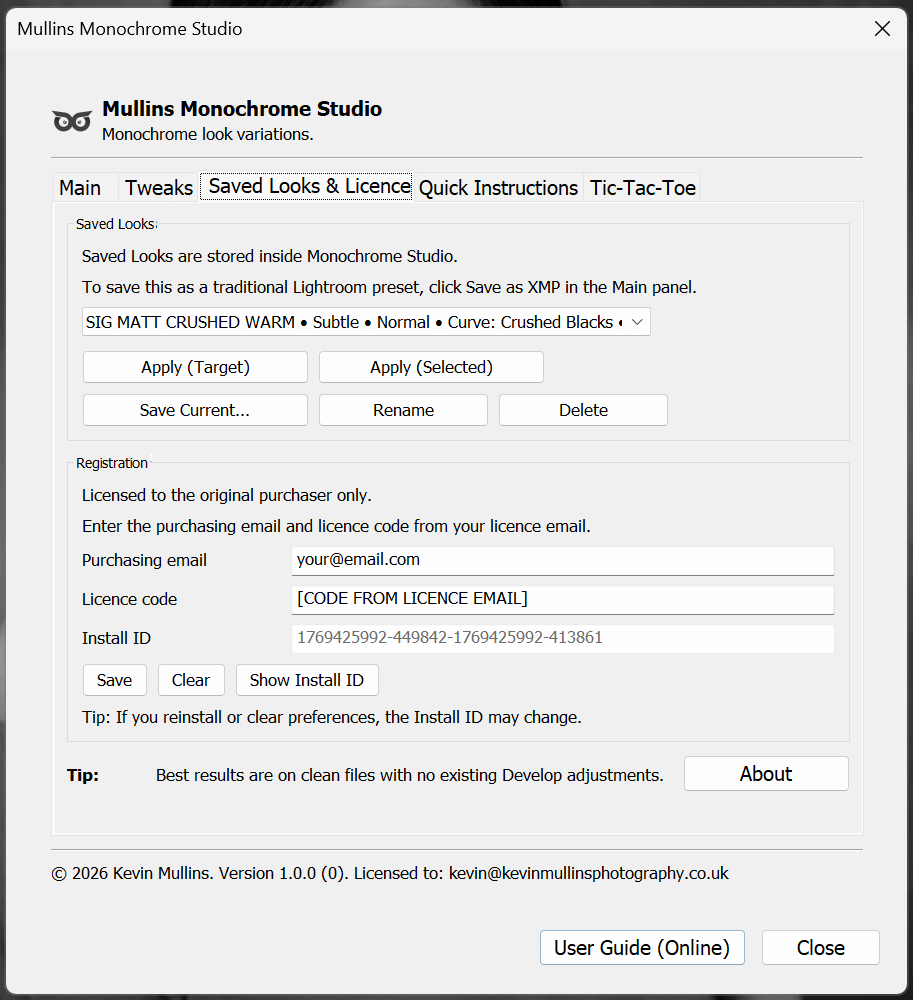
Saved Looks
Saved Looks are stored inside Monochrome Studio. They’re not Lightroom presets.
On-screen note: “To save this as a traditional Lightroom preset, click Save as XMP in the Main panel.”
How to save a look you like:
- Generate a look on the Main tab (or fine-tune it with Tweaks).
- Go to this tab and click Save Current...
- Give it a name you’ll recognise later (think project, mood, or use-case).
Buttons in the Saved Looks section:
- Apply (Target): applies the selected Saved Look to the current target photo.
- Apply (Selected): applies the selected Saved Look to all currently selected photos.
- Save Current...: saves the current look inside Monochrome Studio. Tooltip: “Stores the current look inside Monochrome Studio. This is not a Lightroom preset.”
- Rename: renames the selected Saved Look.
- Delete: deletes the selected Saved Look.
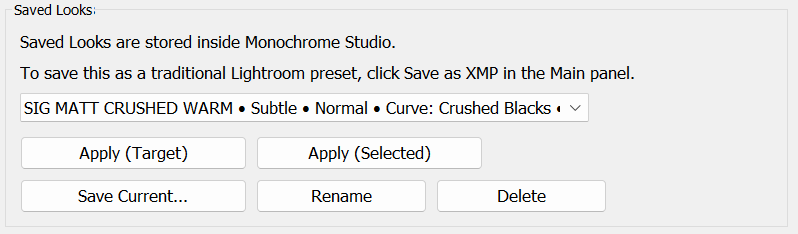
Practical idea: use Saved Looks as your personal “house styles”. Save 5 to 10 that suit your taste, then apply them as starting points and make tiny manual tweaks per photo. It’s faster than reinventing the wheel every time.
Registration
Registration is local to this computer. Enter the purchasing email and licence code from your licence email, then click Save.
Fields you’ll see:
- Purchasing email
- Licence code
- Install ID (shown but not editable)
Buttons you’ll see:
- Save: validates the code format and stores registration details on this computer.
- Clear: clears registration details on this computer.
- Show Install ID: pops up the Install ID in a dialog so you can copy it easily.
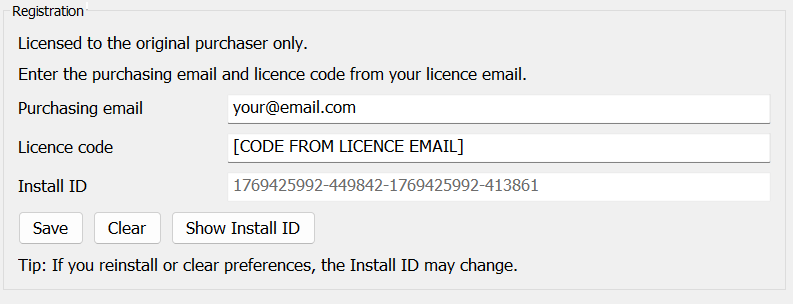
On-screen tip: “If you reinstall or clear preferences, the Install ID may change.”
Quick Instructions tab
This tab is the built-in “remind me how this works” page. If you haven’t used the plugin for a week or two, it’s the quickest way back to being productive.
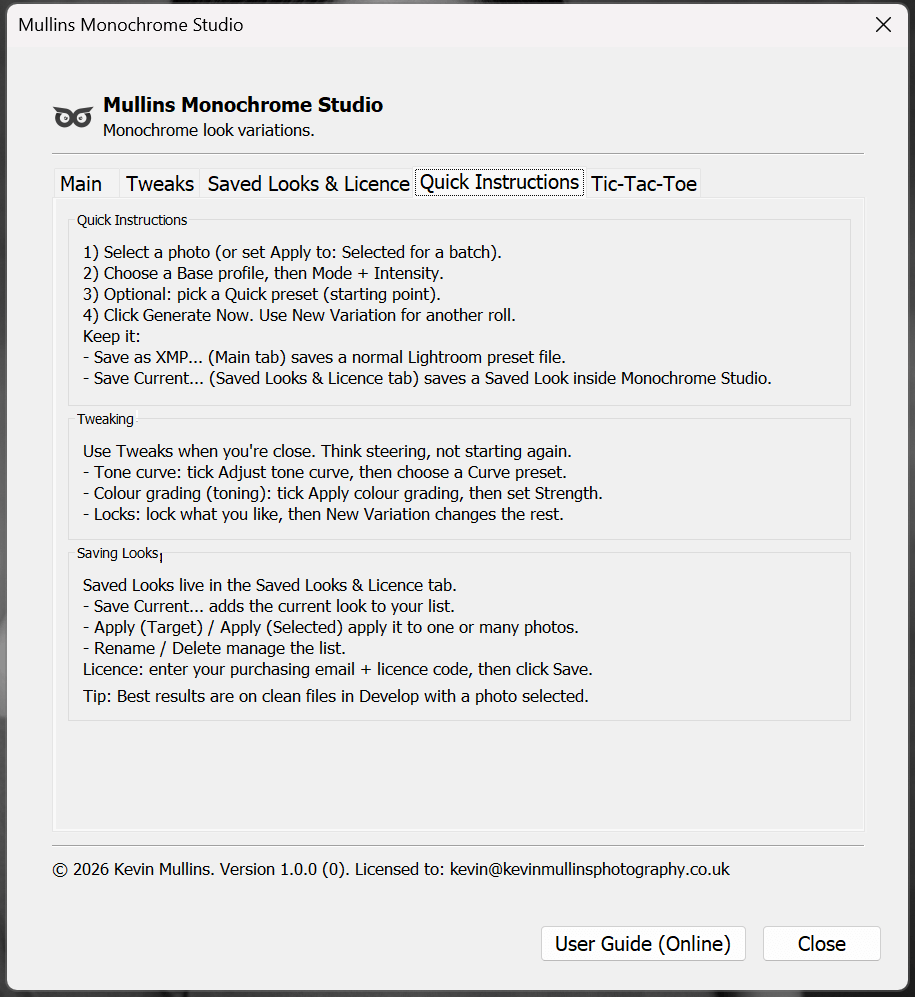
Quick Instructions
- Select a photo (or set Apply to: Selected for a batch).
- Choose a Base profile, then Mode + Intensity.
- Optional: pick a Quick preset (starting point).
- Click Generate Now. Use New Variation for another roll.
Keep it:
- Save as XMP... (Main tab) saves a normal Lightroom preset file.
- Save Current... (Saved Looks & Licence tab) saves a Saved Look inside Monochrome Studio.
Tweaking
Use Tweaks when you're close. Think steering, not starting again.
- Tone curve: tick Adjust tone curve, then choose a Curve preset.
- Colour grading (toning): tick Apply colour grading, then set Strength.
- Locks: lock what you like, then New Variation changes the rest.
Saving Looks
Saved Looks live in the Saved Looks & Licence tab.
- Save Current... adds the current look to your list.
- Apply (Target) / Apply (Selected) apply it to one or many photos.
- Rename / Delete manage the list.
Licence: enter your purchasing email + licence code, then click Save.
Tip: Best results are on clean files in Develop with a photo selected.
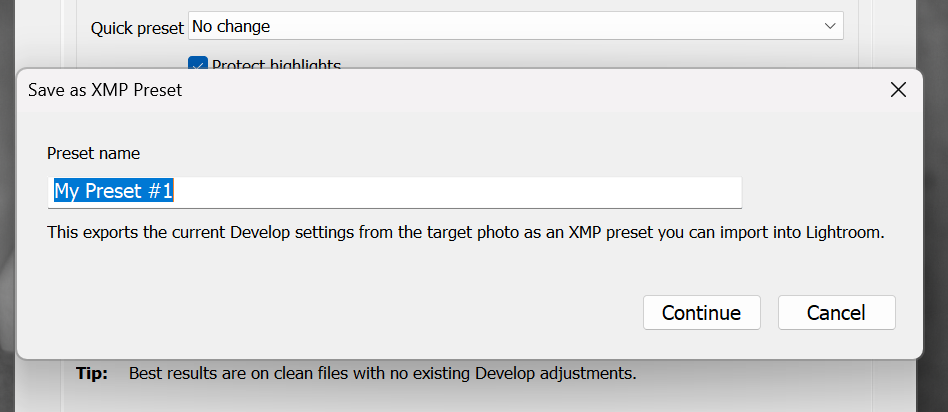
Exporting a preset (Save as XMP...)
Save as XMP... exports the current Develop settings from the target photo as a normal Lightroom preset file (XMP). This is the method to use if you want something that behaves like a traditional Lightroom preset.
Main tab tooltip: “Exports an XMP preset from the target photo. Includes the selected Base profile/look and forces Camera Profile to Adobe Standard so it matches what you see.”

Create the XMP preset
- On the Main tab, get your photo looking how you want (Generate Now, New Variation, and any Tweaks).
- Make sure the photo you want to export from is the target photo.
- Click Save as XMP...
- In the dialog titled Save as XMP Preset, enter a Preset name, then click Continue.
- Choose where to save the file and click Save.
What you’ll see if something goes wrong
- No target photo. (you need to click a photo first)
- Preset name is required. (you left the preset name blank)
- Failed: ... (rare, but if it happens, send Support the message plus a screenshot)
Import the XMP preset into Lightroom Classic
- Go to the Develop module.
- In the Presets panel, click the + button.
- Choose Import Presets.
- Select the XMP file you saved and import it.
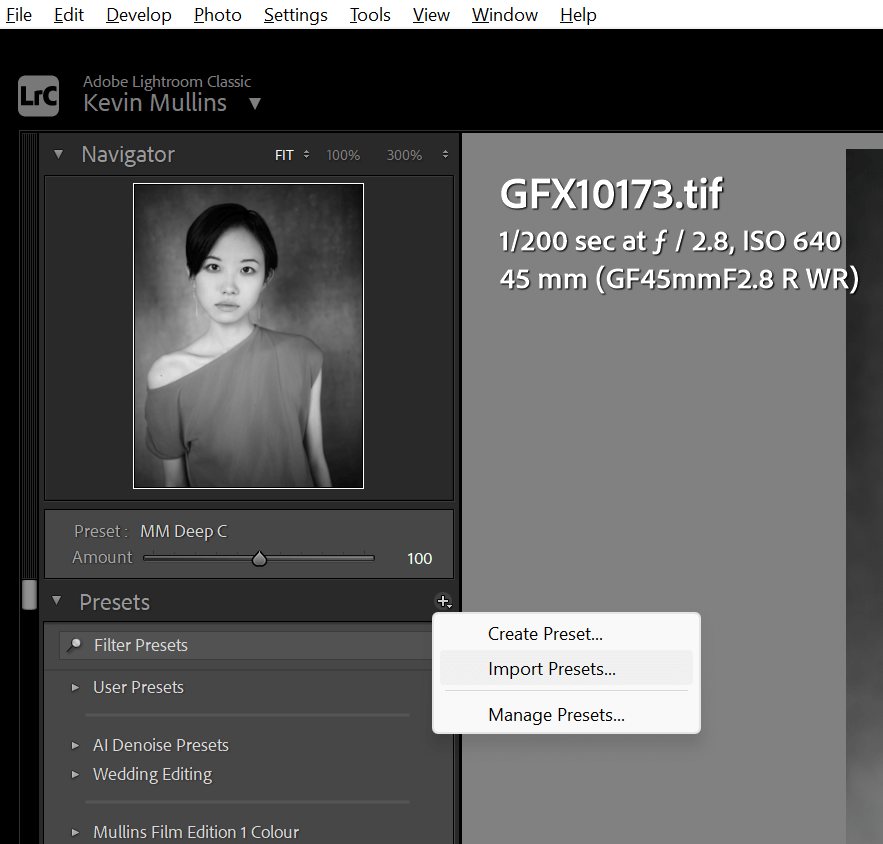
Small but important: the exported preset forces Camera Profile to Adobe Standard so the preset matches what you saw in Monochrome Studio. That’s intentional, but it does mean it may override a camera profile you were using on other photos.
Troubleshooting
If something feels “off”, it’s usually one of these. I’ve kept this section practical, not nerdy.
The plugin won’t open
If you see a message like:
“This plug-in requires Lightroom Classic 10.0 or newer. You are running Classic …”
Then you’ll need to update Lightroom Classic. Mullins Monochrome Studio won’t run on versions older than Classic 10.
Generate Now is disabled, or you get a registration message
You may still be inside the grace period, or you may have hit the end of it. The plugin shows this in the footer:
- Registration pending (… left)
- Registration required
If the grace period has ended you’ll see:
“Your 72-hour grace period has ended. Open Saved & Licence > Registration and enter the purchasing email address and licence code from your order email. If you can’t find it, email me your order number and I’ll resend it.”
Fix:
- Go to Saved Looks & Licence.
- In Registration, enter your purchasing email + licence code.
- Click Save.
Licence code won’t save
If the plugin says:
“That licence code doesn’t look right. Please check the licence code in your licence email and try again.”
Then it’s usually a copy/paste issue (missing characters, spaces, wrong code, or mixing O and 0). Copy it again from the licence email and try once more.
Profiles say Installed, but I can’t see them
The profile status label may show Installed, but Lightroom sometimes needs a restart before it surfaces new profiles in the UI.
Fix: restart Lightroom Classic.
Profiles show Not installed or Repair needed
Use the button beside Base profile:
- Install / Repair if they’re missing
- Install / Repair if the status says Repair needed
You may see prompts like:
“Mullins profiles are not installed yet. Install them now?”
or
“Some Mullins profile files look missing or incomplete. Repair them now?”
Previous Look doesn’t do anything
If you haven’t generated anything yet in this session, Previous Look may show:
“Nothing to go back to yet.”
Fix: click Generate Now first, then Previous Look will have something to step back through.
Save Current... says I need to create a look
If you try to save before generating anything, you may see:
“Create a look first.”
Fix: generate a look on the Main tab first, then save it.
Save as XMP... errors
Two common ones:
- No target photo. (you need to click a photo first)
- Preset name is required. (you left the name blank in the Save as XMP Preset dialog)
When it succeeds you’ll see:
“XMP preset saved.”
Unique per photo is missing
Unique per photo only appears when Apply to is set to Selected photos. If Apply to is on Target photo only, you won’t see it.
Tic-Tac-Toe tab (for fun)
Yep, there’s a Tic-Tac-Toe tab. It’s exactly what it sounds like, and it’s there purely for a bit of fun when you’ve got a spare minute.
This doesn't touch your photos. It's just here for a laugh.
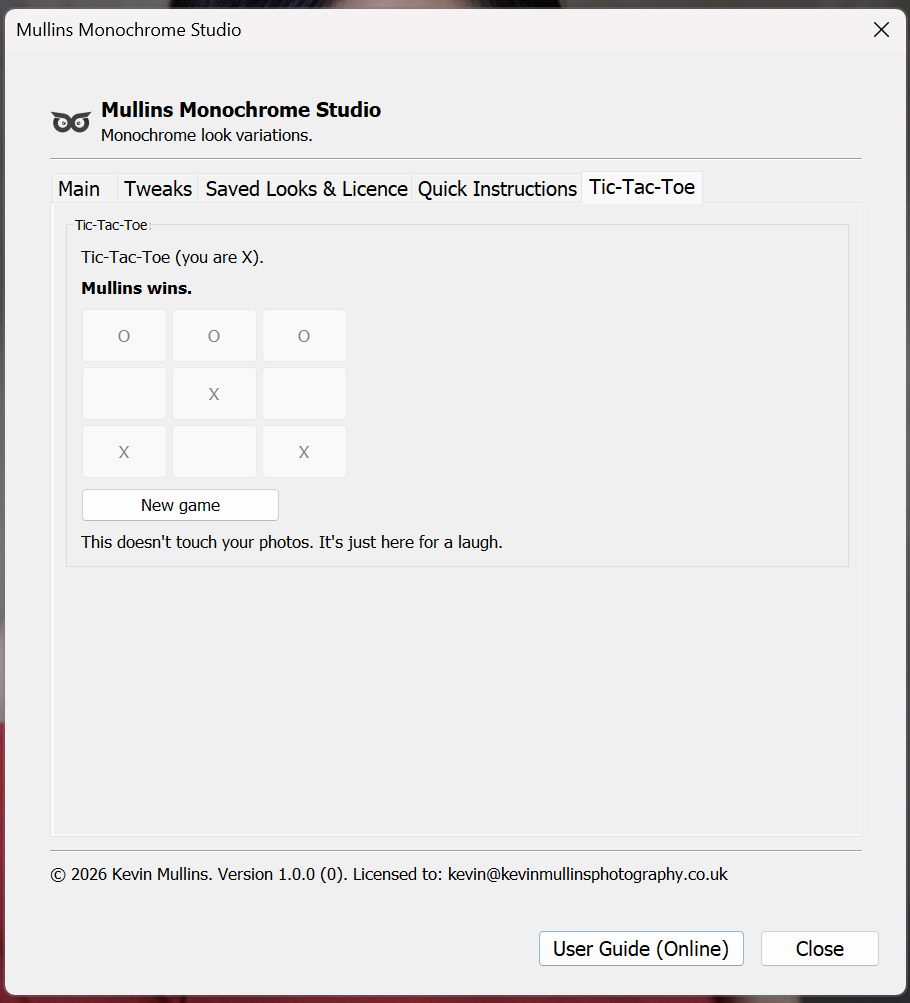
How it works
- You are X.
- Mullins is O.
- Click an empty square to make your move.
- Mullins will play immediately after you.
- The status line will tell you what’s happening, for example: “Your turn. You are X.”, “Mullins wins.”, “You win.”, or “Draw.”
Start over
Click New game to reset the board.
If you beat Mullins, feel free to take a screenshot and brag. I won’t stop you.
Support
If you’re stuck, send a support message using the form below. The more specific you can be, the quicker it gets solved.
Please include
- Your purchasing email (the one used at checkout)
- Your order number if you have it
- Your Install ID (Saved Looks & Licence tab > Show Install ID)
- Your Lightroom Classic version (Help > System Info is fine)
- Windows or Mac (and which version if you know it)
- What you expected to happen vs what actually happened
Best screenshots to attach
- Main tab (especially the Actions: box)
- Saved Looks & Licence tab (Registration box)
- Plugin Manager screen (if it’s an install issue)
- The footer line in the plugin (it shows registration state and version)
Support
If you’re stuck, send me a quick message using this form, and I’ll help you get it sorted.
The more detail you can share, the faster I can diagnose it.
If it’s a licensing issue, your purchasing email and Install ID are the key bits.
If it’s a “something isn’t working” issue, a screenshot of the plugin window and your Lightroom version usually gets us to the answer quickly.